Getting started#
After the first batch deploys, have your coding agent follow the Spec and inspect metrics, logs and alerts before the next batch proceeds. Watch the 30-second run
Run the first-batch check#
With Make, Python 3.9+ and the Go version in go.mod installed, open the checkout containing examples/agent-demo/first_batch.py in your coding agent (such as Claude Code, Cursor, Codex, or Antigravity) and send this message.
Use $open-guardrail-demo to check the first batch and tell me whether the next batch can proceed.
The agent starts a temporary service, checks metrics, logs and alerts against the Spec, and shows its findings and the recorded decision in chat. In the default synthetic data, payment for order-42 was captured while its state is still pending. Expect BLOCKED / DENY. No OpenGuardrail console login is needed.
The agent links a local JSON file with the Run report and the observations behind its decision. You can reopen it after the temporary service, database and credentials are removed. To inspect the live console, ask for it when starting the trial.
Evaluation flow#
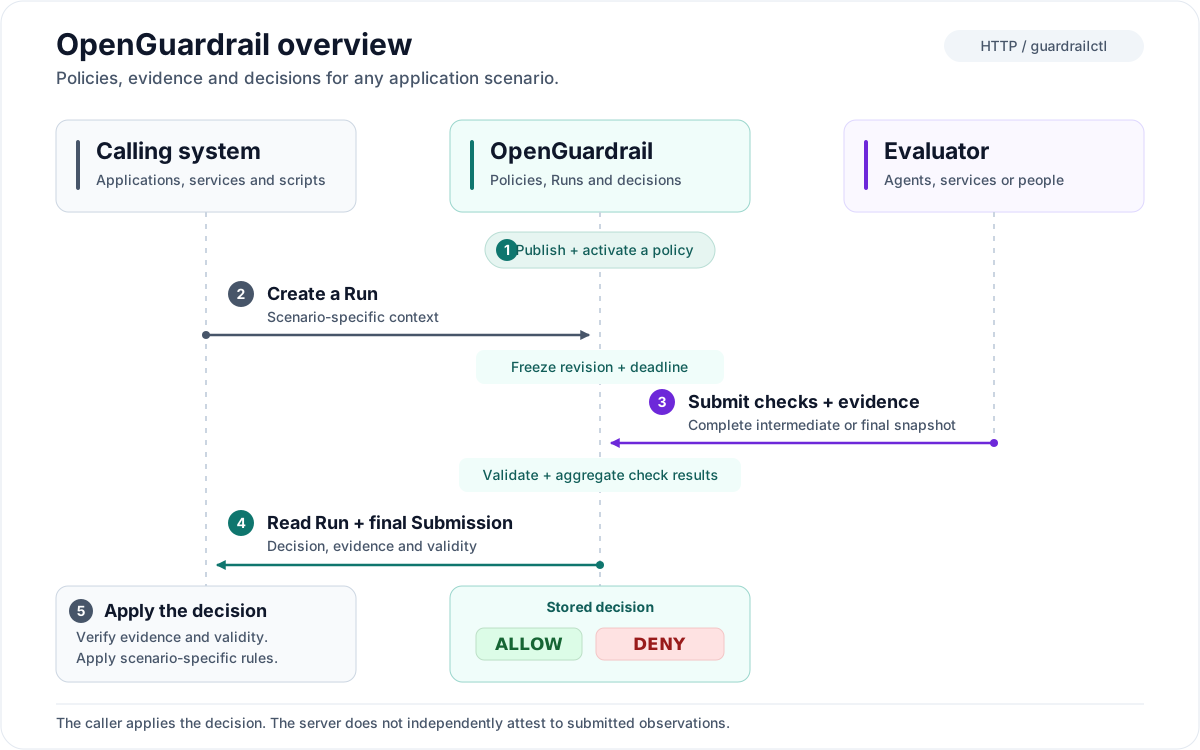
Open the diagram for the full-size SVG. See core concepts for the policy, assessment and decision model.
Prerequisites#
For a source checkout:
- The Go toolchain specified in
go.mod. - Make for
make build. - Python 3.9+ only if you run the local demo below.
Run commands from the checkout root. Building the server and CLI does not require Node.js or Docker.
If you received a preview binary archive, first follow
archive verification.
Run commands from its extraction root. Use ./open-guardrail and
./guardrailctl in place of the source build's ./bin/ paths; running the
binaries needs no Go, Node.js or Python.
Optional file cleanup without a model#
With Python 3.9+ available, run the following command from the source checkout or archive root. A source checkout also needs Go:
python3 examples/cleanup-demo/demo.py
The script builds the commands from source or uses the binaries in an archive. It starts a temporary local service with an auto-generated console password and a controlled file cleanup tool. Source builds can download Go dependencies on their first run. The demo needs Python 3.9+; release assembly and the maintainer verification scripts separately require Python 3.12+.
Open the printed Demo URL first. No login is required for the cleanup task or its Run details. Leave the default selection and click Run cleanup task:
- The runner requests deletion of all four sample files, including protected
orders and configuration. The service stores a
BLOCKED / DENYRun. - The runner narrows its request to the two temporary files and submits a new
assessment. The service stores a
PASS / ALLOWRun. - The deletion tool rereads the Run and accepted evidence, verifies their identity and validity, and deletes only the approved temporary files.
- Inspect both Runs in the page. Restore the files, change the selection or batch limit and rerun to compare the actual result.
The runner is predefined code without a model. Its service calls and file
operations are real. The demo guide
explains the execution checks and limits. To inspect the same records in the
regular UI, open the printed Console URL, sign in as demo using the
temporary password in the printed console-login.json file (or the password you
chose with --prompt-password), and select Runs.
Leave the terminal open while inspecting the records. Ctrl-C stops the service
and removes its temporary data and credentials. The original Recovery contract
self-check is available with python3 examples/agent-demo/smoke.py; it exits
and cleans up immediately. Its --keep-running option preserves the records for
browser inspection until Ctrl-C.
Use the walkthrough below when you want persistent data or your own policy.
For automation, --password-stdin reads a chosen password from standard input
when starting the cleanup demo. Do not put passwords in command-line
arguments or committed scripts. The source-only make demo target is equivalent
to the interactive demo command above.
Manual walkthrough: create and inspect your first Run#
1. Start the service#
From a source checkout:
make build
./bin/open-guardrail serve
Keep that terminal open. The listener defaults to 127.0.0.1:8080, with SQLite
data in ./data/guardrail.db relative to the startup directory.
Open http://127.0.0.1:8080 and create an administrator named admin with a
password you choose. Setup signs you into the browser automatically. There is no
default password.
Local setup without a bootstrap token requires a direct loopback connection. For remote or container deployment, follow Docker deployment and administrator setup.
2. Sign in to the CLI#
Open a second terminal in the same checkout root:
guardrail_cli=./bin/guardrailctl
export OPEN_GUARDRAIL_URL=http://127.0.0.1:8080
umask 077
guardrail_demo_dir=$(mktemp -d)
export OPEN_GUARDRAIL_SESSION_FILE="$guardrail_demo_dir/session.json"
"$guardrail_cli" status
"$guardrail_cli" auth login --username admin
For an extracted binary archive, set guardrail_cli=./guardrailctl instead.
Enter your administrator password at the hidden prompt. Browser and CLI sessions
are separate. This example stores its CLI session and machine credentials in a
private temporary directory outside the source tree.
3. Publish the example policy#
"$guardrail_cli" scene apply --key recovery --name Recovery \
  --spec ./examples/policies/recovery.yaml --publish
"$guardrail_cli" auth create-key --expires-in 1h \
  --result-file "$guardrail_demo_dir/project-key.json"
The policy requires a readiness check with health evidence. The command
publishes and activates the revision; the temporary Project key lasts one hour.
See Scenes and Specs for policy editing and publication.
4. Create a Run#
Create a synthetic change description, then create one evaluation:
cat > "$guardrail_demo_dir/change-set.json" <<'JSON'
{
  "application": "example-service",
  "environment": "local",
  "operation": "recovery"
}
JSON
guardrail_demo_operation="quickstart-$(date +%s)-$$"
"$guardrail_cli" run create \
  --key-file "$guardrail_demo_dir/project-key.json" \
  --scene recovery \
  --change-set "$guardrail_demo_dir/change-set.json" \
  --operation-id "$guardrail_demo_operation-create" \
  --submission-credential-file "$guardrail_demo_dir/run-credential.json"
The command prints a Run object with status: "OPEN". Copy its top-level id
into this variable, replacing the example value:
guardrail_demo_run_id=run_REPLACE_WITH_RETURNED_ID
The Run freezes the policy revision, caller-defined changeSet and deadline.
The submission credential is saved privately; the CLI does not print its token.
Complete the next step before the Run deadline. For an uncertain create result, retain the same operation ID and inspect state before retrying. The initial credential is returned only once; see credential recovery.
5. Submit a synthetic passing assessment#
Submit a synthetic passing assessment; the timestamp is generated at execution time:
cat > "$guardrail_demo_dir/submission.json" <<JSON
{
  "baseSubmissionNo": 0,
  "finishRun": true,
  "verdict": "PASS",
  "summary": "Synthetic local recovery assessment",
  "checks": [
    {
      "checkId": "readiness",
      "verdict": "PASS",
      "summary": "Synthetic health observation is healthy",
      "evidence": [
        {
          "requirementId": "health",
          "observedAt": "$(date -u +%Y-%m-%dT%H:%M:%SZ)",
          "querySummary": "Read a synthetic local health observation",
          "resultSummary": "Example service is healthy; no real service was queried"
        }
      ]
    }
  ]
}
JSON
"$guardrail_cli" run submit \
  --submission-credential-file "$guardrail_demo_dir/run-credential.json" \
  --submission "$guardrail_demo_dir/submission.json" \
  --operation-id "$guardrail_demo_operation-submit" \
  "$guardrail_demo_run_id"
"$guardrail_cli" run get \
  --key-file "$guardrail_demo_dir/project-key.json" \
  "$guardrail_demo_run_id"
The returned Run should have status: "FINISHED", result: "PASS" and
decision: "ALLOW", plus its final submission ID and decision expiry.
6. Inspect the record#
In the browser, open Runs, select the returned Run ID and inspect its frozen policy reference, evaluation context, submitted evidence and decision.
A real integration must verify the authoritative Run, decision validity and observations it relies on. See Runs and submissions and the integration recipes.
Troubleshooting#
| Symptom | Next step |
|---|---|
| Python version error | Check python3 --version and use Python 3.9+ for the demo. The native binaries and manual walkthrough do not require Python. |
| Go is missing or the build fails | A source checkout needs the Go version in go.mod and access to its public dependencies. Run make build for compiler diagnostics, or use a native archive. |
| Server exits or does not become ready | The cleanup demo reports a safe error category and the command's exit code when available. Run ./bin/open-guardrail serve from source or ./open-guardrail serve from an archive for detailed startup diagnostics. Check the data directory, native binaries and port. |
| Demo address returns 403 | Open exactly the printed http://127.0.0.1:<port> address. The cleanup demo does not accept localhost or other hostnames. |
| Recovery self-check exits before you can open Runs | Run python3 examples/agent-demo/smoke.py --keep-running and keep that terminal open. The default Recovery self-check deliberately removes its temporary records; the cleanup demo already stays running. |
| Browser login fails | Use username demo and the temporary password in the printed console-login.json file (or the password you chose with --prompt-password / smoke.py --keep-running). The walkthrough's admin account and an existing service are separate. |
| Hidden password prompt needs a terminal | Run interactively, or pass --password-stdin for automation. The Recovery self-check additionally needs --keep-running when you want to inspect its temporary records. |
The demo never prints its password to stdout (by default it writes the auto-generated password to console-login.json and prints only that file path) or captured credential-bearing command output.
When reporting a problem, include the step, exit code, version and platform.
Keep passwords, session files and machine credential files private.
Clean up or keep exploring#
The service data persists in ./data. Stop the server with Ctrl-C and restart
from the same directory to keep your administrator, policy and Run.
Use --data-dir /path/to/persistent/data when you want an explicit storage location.
First revoke only the Project key created for this walkthrough. While the administrator CLI session is still active, inspect the secret-free metadata:
"$guardrail_cli" auth list-keys --page-size 20
Identify the walkthrough's key by its issuance time, role and scopes. Its private
credential file also records the same non-secret keyId; compare only that field
locally if needed, without displaying or sharing the token. Follow nextAfter
with --after CURSOR if the key is on another page. Do not revoke a key used by
another integration.
Replace the example ID with the selected key's id, then revoke it:
guardrail_demo_key_id=key_REPLACE_WITH_DEMO_KEY_ID
"$guardrail_cli" auth revoke-key --key-id "$guardrail_demo_key_id"
After revocation succeeds, remove the temporary CLI session and files in the second terminal while its variables are still set. If revocation fails, retain the session and credential file until you have resolved the error.
"$guardrail_cli" auth logout
rm -f "$guardrail_demo_dir/session.json" \
  "$guardrail_demo_dir/project-key.json" \
  "$guardrail_demo_dir/run-credential.json" \
  "$guardrail_demo_dir/change-set.json" \
  "$guardrail_demo_dir/submission.json"
rmdir "$guardrail_demo_dir"
unset OPEN_GUARDRAIL_SESSION_FILE
Removing a machine key file does not revoke that key. Revocation and secret rotation are implemented; revocation immediately prevents subsequent key authentication without canceling already-authenticated requests. See Project machine keys for lifetime, rotation and recovery rules. Use this walkthrough with a local evaluation service.
Next, try the agent-driven demo, configure PostgreSQL or remote access, or read the contribution guide.