
A pelican riding a bicycle
Operating the UI like a person.
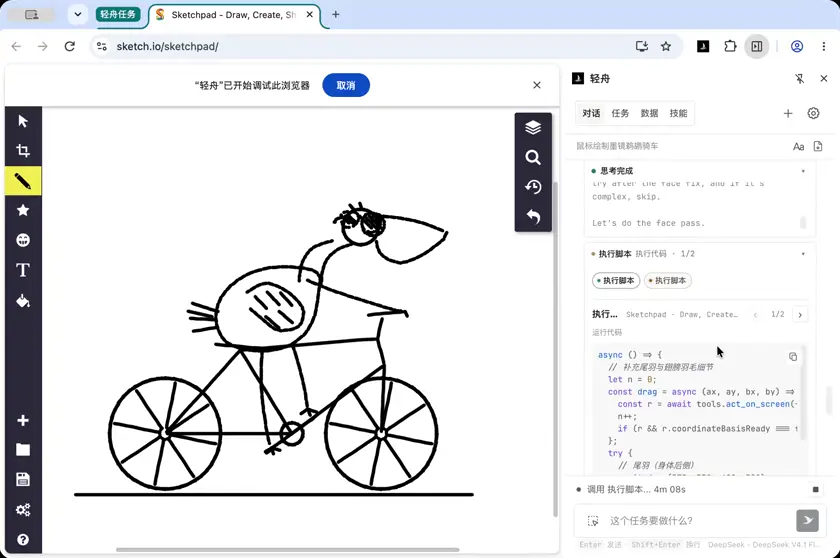
仅用鼠标画一个戴墨镜的鹈鹕骑自行车
历史思考 1
1/3
用户要求:只用鼠标画一个戴墨镜的鹈鹕骑自行车,在 sketch.io/sketchpad 上。 需要:use_tab 认领标签页,观察页面,然后用 act_on_screen 鼠标拖动绘制。 这是一个有趣的绘图任务。我需要用鼠标拖动来画线条。act_on_screen 支持 drag 操作。 首先观察页面。 让我先 use_tab 然后 screenshot actionable。 计划:用一系列 drag 动作画鹈鹕骑自行车。每一笔都要 returnScreenshot(至少第一步验证),然后可以在 run_script 中串行执行已验证的笔画。 实际上 run_script 中调用 tools.act_on_screen 可以批量执行 drag,速度更快。 先看页面。
历史思考 2
2/3
Let me take an actionable screenshot to see the canvas.
最近思考
3/3
画布是白色空白,坐标空间 1488x1202。绘图区大约 x 从 100 到 ~2050? Wait, the screenshot is 1488x1202 but the actual page viewport was 744x657 → scale 2x. Canvas rect x=50..744 → in screenshot 100..1488.

So drawing area: x from ~100 to 1488, y from 0 to 1202.

The pencil tool is selected (highlighted). I need to check brush color/size. There may be a color panel that appears when pencil selected. Actually the left toolbar shows pencil highlighted but no options panel visible. Hmm, typically sketch.io shows brush options on the left bottom. Let me just start drawing with default black.

Plan the drawing. Canvas center around (740, 600). Let me design a composition:

- Bicycle: two wheels (circles), frame, handlebar, seat, pedals.
- Pelican sitting on seat, leaning forward, with big beak, wearing sunglasses.

Coordinates (in screenshot pixel space, 1488x1202):

Let's put the bike roughly centered:
- Rear wheel center: (520, 900), radius 130
- Front wheel center: (980, 900), radius 130

Hmm, but pelican should sit on bike with the bike large enough. Let me scale:
- Rear wheel center (500, 920) r=120
- Front wheel center (1000, 920) r=120
- Frame: bottom bracket at (750, 920), seat post top at (640, 700), head tube top at (960, 700).

Pelican body on seat around (620, 640), body ellipse, long neck going up-forward, head with big beak around (880, 480), sunglasses.

Draw order: bike first, then pelican.

Circles: drag-based mouse drawing of a circle is hard. Better: I can draw a circle as a series of small drag segments? Each drag is one stroke. Multiple strokes would look segmented but if each segment is small and continuous, it looks like a circle with slight joints. Actually a single drag can only be a straight line (start→end)? CDP mouse move interpolation — the act_on_screen drag likely moves with some interpolation (maybe a few steps). That would make straight lines only.

Hmm. That's a problem for circles. Options: draw circle as polygon approximation with many short drag segments (~20 segments), each a short arc chord. With line width default maybe ~6px, joints would be ok-ish. But each drag adds nodes; sketch.io freehand draws smooth curve through points. Multiple strokes will each be separate paths, slight overlaps. Visually could be acceptable — a hand-drawn look.

Alternative: check if drag interpolates with intermediate mouse moves. Let me test with a small arc first and observe.

Actually a better approach: I could use the mouse to draw with many points in a single stroke if act_on_screen drag does interpolated movement. Let me test: do one drag making a quarter circle by... no, drag only takes start and end.

Let me test whether intermediate moves happen: draw a drag from (400,400) to (600,400) and see if line is straight (yes obviously). Doesn't tell interpolation.

Alternative approach: use tools.act_on_screen with drag in a loop of ~24 segments per circle — that's a lot of calls but they can run inside run_script serially. Let's test speed with a simple circle.

Actually, wait. Maybe there's a smarter path: Sketch.io might have a shape tool (the "pencil" icons). But instructions say "仅用鼠标画" — only use the mouse. So use drawing strokes.

Let me do: test a circle with 24 segments via run_script calling tools.act_on_screen drag each. Then screenshot to evaluate.

Actually, potential issue: each drag may have a small delay. 24 segments × maybe 300ms = 7s. Fine.

Let me first test a small circle to check rendering quality and confirm coordinate basis.

Let me design the full drawing at a good size. Composition in 1488x1202 space:

Bicycle:
- Rear wheel: center (500, 880), r = 135
- Front wheel: center (1010, 880), r = 135
- Wheel hubs, spokes optional (a few lines)
- Bottom bracket: (720, 880)
- Seat post top: (640, 640); seat at (600-680, 620)
- Head tube top: (960, 650); handlebar at (960-1000, 610)

Pelican:
- Sits on seat: body ellipse center (700, 570), rx 110, ry 90
- Neck: from (760, 520) up to head (880, 380)
- Head: circle center (890, 370), r 45
- Beak: large pouch: from (930, 375) forward-down to (1090, 430), pouch curve back to (935, 420)
- Sunglasses: two dark lenses around (870,360) & (915,360), plus bridge
- Eye? behind lenses.
- Legs: pelican legs down to pedals: from body bottom (720, 640) to pedal (760, 900)? Legs would cross bike frame. Fine, pelican has orange legs going down to pedal crank at (720, 880). Actually pelican riding: legs go down and forward to pedals at around (760, 900) and (700, 870).
- Feet: webbed.
- Wing: a curve on the body suggesting a wing holding handlebar? Maybe a wing reaching to handlebar.

Also maybe add a small sun/ground line? Keep focus.

Colors: default black stroke. Filled areas? Sketch.io pencil is stroke only. Filling would require lots of strokes. I could hatch the sunglasses lenses with a few diagonal strokes to make them look dark. And the beak pouch could be left as outline. Let's add a couple of hatch lines in lenses.

Let me also consider using multiple strokes per circle for quality: Instead of 24 chords, use 36 with smaller chord length. Chord length for r=135, 36 segments: 2*135*sin(5°)=23.5px. That's ok with line width ~4-6.

Also sketch.io smooths strokes; a short chord stroke from A to B as freehand might be drawn as a line. Should be fine.

Let me implement a helper: drawPolyline(points) where each consecutive pair is a drag, but to reduce number of calls, maybe each drag can cover a small arc chord — yes that's what we do.

Let me first do a quick test on a small circle (r=60) at top-left empty area, then screenshot to inspect. Actually to save time, let's just draw the two big wheels and screenshot, then evaluate quality. If bad, undo (Ctrl+Z) and use different approach.

Undo: Ctrl+Z. Each stroke = one undo step presumably.

Let's proceed: draw rear wheel with 36 segments.

I'll write run_script with tools.act_on_screen calls, mutatesPage: true, timeout 120.

Careful: each act_on_screen requires returnScreenshot param explicitly. Set false, and at the end take a screenshot.

Note coordinate basis: after drags, coordinateBasisReady should remain true since viewport unchanged. Check returned values.

Let me write the script.

function circle(cx, cy, r, segs) {
  points = for i in 0..segs: angle...
  for each consecutive pair: await tools.act_on_screen({action:"drag", x:a.x, y:a.y, endX:b.x, endY:b.y, returnScreenshot:false})
}

Drag might need a duration; there's no duration param for drag, only long_press has durationMs. OK.

Let me test with rear wheel first.

Also possibility: sketch.io may require that strokes not be too short/interrupt. Let's try.

Let's go.
使用页面
Sketchpad - Draw, Create, Share!
1/3
解析页面树
Sketchpad - Draw, Create, Share!
2/3
RootWebArea "Sketchpad - Draw, Create, Share!" url="https://sketch.io/sketchpad/"
StaticText ""
StaticText ""
StaticText ""
StaticText ""
StaticText ""
StaticText ""
StaticText ""
StaticText ""
StaticText ""
StaticText ""
StaticText ""
StaticText ""
Canvas
Canvas
generic editable=richtext
StaticText ""
separator
StaticText ""
separator
StaticText ""
separator
StaticText ""
页面截图
Sketchpad - Draw, Create, Share!
3/3
页面截图已获取
图片信息
method
cdp
提示
已获取可操作的页面截图。act_on_screen 会自动使用当前任务的最新页面截图;每次操作必须显式决定是否返回后置截图。

画布是空白的,铅笔工具已经选中。我先画后轮,测试用鼠标拖拽画线的效果。
历史思考 1
1/22
The circle rendered but as a dashed/dotted line — each chord segment appears as a short dash, not connected. Actually looks like the strokes are quite thin and dashes. Hmm, at this resolution it looks like a dotted circle. The strokes appear separated because each drag draws a stroke but maybe with taper (sketch.io brush has taper at ends), making each chord look like a lens/dash shape. Also line width seems thin (default 1-2px?). Let me check brush settings. The dashed appearance: sketch.io's default pencil likely draws tapered strokes, so joins look thin. Better approach: increase brush size and use a smoother technique. Maybe there's a brush size panel. Let me look for it. In sketch.io, clicking the pencil opens options at bottom-left? Actually the left sidebar has icons; clicking "pencil" shows a swatch panel on the far left bottom? Let me inspect the DOM for color/size controls. Alternatively, I could draw circles as a filled shape tool... but "仅用鼠标画" — using the shape tool with mouse is still mouse drawing I'd say, but risky since simpler. Hmm, maybe better: instead of splitting circle into segments, do each circle as one continuous drag with... no, only straight lines. Wait — maybe act_on_screen drag does interpolate mouse moves (multiple moves). If the mouse moves are interpolated, sketch.io would draw a smooth path. But the result shows dashes because the strokes are separate objects, each with taper. Actually looking closer at the rendered image, the circle does look continuous-ish but dotted/dashed. It's probably because each stroke is a separate SVG path with taper on both ends and default width small. Improve: find brush settings to increase size. Let me inspect DOM for size controls. Let's take an actionable screenshot after clicking the pencil? The pencil is already active. In sketch.io, when a brush is selected, a panel appears on the left side under the toolbar? The screenshot shows nothing. Maybe the panel appears at bottom-left only when clicking the brush icon again. Let me get the AX tree of the left toolbar region... StaticText nodes were empty. Let's read DOM to find settings. Alternatively, use keyboard? Sketch.io has hotkeys: [ ] for brush size maybe. Let me inspect the page DOM for brush size slider.
历史思考 2
2/22
No size input found; the brush panel probably appears as a canvas-based UI (sketch-tool with canvas). Clicking the pencil tool likely opens a brush settings popup (rendered as canvas swatches). Let me click the pencil tool again to see if a panel opens, then screenshot. Actually earlier the pencil was already selected and no panel shown. In sketch.io, brush settings appear in a left-bottom popup after clicking the pencil icon (which acts as toggle). Let's click it and screenshot. But careful: clicking pencil icon again might deselect? Let me instead try keyboard shortcut for size: many apps use [ and ]. Hmm. Alternative approach that avoids needing thicker brush: draw with many strokes to make thicker lines by offsetting? Overkill. Actually the dashed look might be fixable differently: maybe the strokes ARE continuous but very thin (1px at DPR2?). Looking at the image, the circle looks dashed with gaps, meaning strokes are separate with gaps — because taper makes ends thin, the chords' ends vanish, creating gaps. Solution: overlap the chord segments (e.g., start each segment slightly before the previous end). With taper, overlapping regions still thin at ends. Hmm. Better: draw each arc chord with overlap of e.g. 40% — ends tapered will be covered by the neighbor's thick middle. That should give a continuous look. Let's test: use segments with overlap. But first, try to find brush size. Click pencil icon and screenshot. Let me click on the pencil tool (uid) and screenshot. The pencil icon at screenshot coords ~ (50,195) in 2x space = (25,97) CSS. Use act_on_element with the sketch-tool? Not in ax tree. Use act_on_screen click at (50,195) on the screenshot basis. But coordinate basis may still be valid (last screenshot returned by run_script screenshot). The coordinate space 1488x1202 still valid. Let me do that and see if a panel appears.
历史思考 3
3/22
Clicking the pencil shows a tooltip "铅笔" only; no settings panel. There's a "描边"/"paintEditor" tool (the icon with the pen nib at y=530). That's the paint editor for brush settings. In sketch.io, the brush settings panel appears when clicking the brush icon in the bottom-left? Actually the "paintEditor" tool (ink pen icon) opens a brush/color picker panel. Alternative: draw thicker strokes by using the pencil with multiple offset passes. Or check keyboard shortcut. Actually simpler: strokes look dashed because the pencil has a tapered/hard brush with low width. If I draw each chord twice with slight offsets it'd get thicker/denser. Hmm wait. Maybe the dashed appearance is because each drag segment's stroke is a "dot-dash" from high-speed interpolation? Unlikely. Better plan: try the paintEditor tool (cursor icon at (50,530)) which likely opens brush options with size/color. Let's click it and see. Actually let me reconsider: the palette icon at (50,360) is "clipart". The (50,530) icon looks like a pen nib with drop — "paintEditor". Yes, clicking that opens the brush editor panel (color, size, opacity). Let me click (50,530).
历史思考 4
4/22
The brush settings panel opened. Line width shows "2px" with a dropdown at around (523,560). There's also a slider at bottom (opacity slider ~ y=628). Let's set line width larger, e.g. click the "2px" dropdown to reveal size options. Click at (523, 560).
历史思考 5
5/22
Oops, that opened a color picker for 填充 (fill) — seems I clicked the fill color area. Also it switched brush to 矢量填充 (vector fill)? The left panel now shows "矢量填充" brush selected with fill color CEF28F. Hmm, that's the tool palette changing brush type? It seems clicking near the panel changed the brush dropdown to 矢量填充. I need to be careful. I want: brush = 铅笔 (pencil), stroke width bigger (e.g., 4-6px), stroke color black. Let me close this color popup (press Escape) and re-open brush settings. Then read the DOM for the panel to get precise control positions. Actually a cleaner approach: use run_script to inspect the panel DOM (it's a custom element maybe with shadow DOM). Let me investigate the DOM structure of the brush panel to find clickable rects for the brush dropdown and the size options. Alternatively: perhaps easier to just accept 2px strokes and draw the picture carefully — but the dashed look is ugly. Note dashes appear because of taper? With 2px width and 100% opacity, a continuous line should look continuous. The dashed appearance suggests each stroke is drawn with a "speed-based taper" so ends are thin/invisible. With overlap, gaps would disappear. Let me try the overlap approach quickly: draw a test circle with 50% overlap and see. But first close the color popup and restore pencil. Actually, maybe better: the size slider at the bottom of the panel (the light slider at y≈628) sets brush size! The panel had "线宽 2px" with a slider below. The slider knob was at left (~x=183). Dragging it right increases width. That's a mouse-friendly way. Plan: Escape to close color picker, then re-open the paint editor panel (click pen icon), set brush type back to 铅笔 via dropdown, then drag the size slider. But wait, the panel's state changed: brush now 矢量填充. Clicking the brush dropdown (at (536,145)) shows brush list. Hmm, this is getting complex. Let me use run_script to dump DOM around the panel to understand structure, which could let me click precisely. Many of these panels are custom elements with canvas-drawn UI, hard to parse. Alternative simpler approach: keyboard shortcut. Sketch.io pencil sizes might respond to keys. Unknown. Alternative pragmatic approach: accept 2px default and make strokes continuous by overlapping chord segments significantly. At 2x scale (screenshot pixels = 2× CSS), 2px CSS width = 4 screenshot px. The circle looked ~2px thin in screenshot... the image is scaled down for display anyway. Honestly, a nicer approach for quality: use the "矢量填充" (vector fill) brush? No, that fills shapes. Let me reconsider: maybe use the paint editor's size slider (bottom slider). In the earlier screenshot, at y≈628 there's a slider track from x=137 to x=568 with knob at x=183. That's likely the size slider (it was under 线宽 row). Dragging knob to the right → larger size. Let me: press Escape to close color popup, click pen icon again to toggle panel (or it may still be open), then drag slider knob. Sequence: 1. Escape. 2. screenshot to see state. Let's do it.
历史思考 6
6/22
The color picker is still open. Let me inspect the DOM to find precise elements: brush dropdown, size slider, color cells. The app may use custom elements. Let me dump outerHTML of the panel region. Maybe easier: rather than fight the UI, take a decision — use the 矢量填充 brush? No. Let's dump DOM to find clickable elements and their rects from the page (coordinates in CSS px; screenshot = 2× CSS since viewport width 744 vs image 1488). I can list elements whose rect intersects the panel area and that look interactive. Let me write a script listing elements with class names in area x<600,y<700 CSS.
历史思考 7
7/22
The panel is at CSS (64,200) with size 226x120 — that's the collapsed popout showing brush selection. Because the color popout expanded, the list got truncated at 120 elements. Let me query more specifically: the popout content contains rows: brush type trigger (grid-view-trigger), fill row, stroke row, width row, size slider. Coordinates in CSS: popout x=64..290, y=200..320. Rows: brush title 200-260, fill 261-320. But screenshot showed more rows (fill, stroke, width, slider) beyond y=320 — the popout grew. My filter cut at 720 CSS... no, count 53 means many elements skipped by width/height filters? Hmm, the popout probably has children extending. Let me directly query `sketch-toolconfig` subtree outerHTML to understand structure and get element rects.
历史思考 8
8/22
Wait — this toolconfig has only 2 rows now (brush type + fill). Earlier the screenshot showed fill/stroke/width rows. Currently the brush is 矢量填充 which has only fill row. So earlier when pencil was active the config had 填充/描边/线宽 rows with a size slider. So: I should switch brush back to 铅笔 (pencil) via the grid-view-trigger (click at CSS (177,230) → screenshot (354,460)). Then the config will show 描边 and 线宽 rows including size slider. Then set width via the slider (drag) or via sketch-input number. Plan: 1. Click brush dropdown at CSS (177,230) / screenshot (354,460) to open brush list; choose 铅笔. 2. Inspect config tree → find 线宽 row's slider element rect, drag knob. 3. Then draw. Note: the color popup is still open, obscuring. Clicking the dropdown should close it. Let me click (354,460) in screenshot coords.
历史思考 9
9/22
The dropdown shows brush-type options: 矢量填充 / 像素填充 (vector fill / pixel fill). These aren't pencil variants — this is the "paintEditor" tool (fill tool), not the pencil. So the config relates to the fill tool. Oops: my earlier click at (50,530) selected paintEditor tool, changing the active tool from pencil to paintEditor. The 2px 线宽 panel earlier was the pencil's config (opened after clicking pencil at (50,196)). So: the pencil config panel had 描边 row + 线宽 row with slider. Let me close this dropdown (Escape), click the pencil tool again (CSS 0-49, y 80-120 → screenshot (50,196)), which opens the pencil config popout, then inspect the sketch-toolconfig tree to find the size slider and stroke color. Let's do: Escape, click pencil, then run script to dump toolconfig tree.
历史思考 10
10/22
Now click pencil tool (screenshot coords (50,196)) then dump config tree via run_script.
历史思考 11
11/22
Two popouts overlap. Pencil tool is now selected (highlighted yellow) with pencil config panel: 铅笔 / 正常 / 填充 0% / 描边 100% (black) / 线宽 2px + slider knob at (183,628). The fill-tool popout overlapped on top. Escape should close popouts. Then I'd need to reopen the pencil config… Actually the pencil config opens when the tool is clicked. Since the fill popout is on top (it's a separate popout for paintEditor?), Escape closes it. Let's Escape then check. Then, use the pencil's size slider: drag knob from (183,628) to right, e.g. x=240 for maybe 6-8px. Actually maybe easier and more robust: set line width by editing the sketch-input number? The 线宽 value "2px" is in a sketch-input with contenteditable. I could click it and type. But it's a dropdown-ish. Let's try clicking on the "2px" text (523,560) → earlier that opened the fill color. Hmm that was the fill row (in that earlier screenshot y=560 was 线宽 row?). Earlier screenshot: rows at y≈145 (铅笔), 240 (正常), 320 (填充 0%), 470 (描边 100%), 560 (线宽 2px), slider 628. I clicked (523,560) and it opened a color picker for 填充... because maybe the dropdown arrow at x=523 belongs to 线宽? It showed '#CEF28F' color. Confusing. Let's just use the slider: drag from knob (183,628) to (260,628) etc. We'll verify by reading the "px" label from DOM after drag. First Escape to close overlap.
历史思考 12
12/22
Now pencil config is visible: 铅笔, 正常, 填充 0%, 描边 100% black, 线宽 2px, slider with knob at x≈183,y≈628 (screenshot coords), track from ~145 to ~568. Drag knob to about x=250 to get maybe 6px. Let's compute: track length 423 px for range maybe 1-100? With current value 2px at position 183 (start 145 → 38px offset). Hmm if range 1..30, 38/423*29 ≈ 2.6 ≈ 2? plausible (range 0-20?). Let's aim for a width around 6-8px: offset ~ (7-1)/29*423 = 87 → x=232. I'll drag to 240 and then check the label via DOM. Then also maybe shading: for the sunglasses I'd like a filled dark area. Filling could be done by hatching with a few strokes. Let's drag the slider.
历史思考 13
13/22
The drag drew a short line on the canvas at (183,628)-(245,628) — the slider wasn't there; the panel had already closed (the popout closed when I pressed Escape... no, Escape closed it). Indeed, the panel closed and my drag drew a stroke on canvas instead. Oops. So now there's a stray line at ~(183,628). I should undo it (Cmd+Z? undo button on right toolbar at (1387,258) — the ↻ undo arrow). Let me click undo. Then reopen pencil config by clicking pencil icon, and use the slider properly. But the panel closes when clicking elsewhere. My drag at y=628 was inside panel region earlier when panel open... but Escape closed the panel before. Plan: click pencil icon (opens panel), then immediately drag slider — but each action closes? No: clicking pencil icon while panel open toggles. Earlier sequence: clicked pencil at (50,196) → panel opened. Then clicking (523,560) opened color picker. So the panel stays open while interacting. The issue was Escape closed the panel. Now: undo the stray line first, then click pencil icon to reopen panel, then drag slider. Undo button: right toolbar has three icons: layers (top), zoom (search), history (circular arrow at y≈211), undo (arrow at y≈258). Let's click (1387,258). Actually keyboard Cmd+Z likely works. Use press Meta+Z.
历史思考 14
14/22
Undo removed the stray line but left a tiny dot at (245,628). Undo again to remove the dot? Actually the undo removed the stroke but a dot remained (the mouse-down point?) Hmm, it left a small dot. Undo again. Then reopen pencil panel and change width. Let me do undo once more via the undo arrow icon (1387,258).
历史思考 15
15/22
Oops — that undo removed one of the circle's segments (top gap). Undo removed the last stroke (one chord). The dot disappeared too? There's now a gap at top of the circle. I need to redo to restore the segment. Click redo (the second arrow at y≈373). Then proceed: the stray dot... Actually the dot was gone after this undo. Hmm, the previous undo... Let's just redo one step to restore the chord, and the dot may come back — but the dot is tiny and at (245,628) which is in empty area; when I draw, it will just be a stray dot. I could remove it later or leave it (could be a "bug" in the drawing). Better: redo then handle later. Actually alternative: clear everything and start fresh with correct brush width. That's cleaner. There's likely a "new" document tool (the + icon). Let's do that: it'll wipe the canvas clean, then set brush width properly and draw. But careful: clicking "+" might prompt to save. Let's try. Plan: 1. Click new (+) at (50,805). 2. Handle any dialog. 3. Click pencil tool to open config, drag slider to increase width, verify width label via DOM. 4. Draw the picture. For setting width robustly, maybe I can find the slider element in the DOM and see its rect while panel open, then use a mouse drag on the proper element with proper coordinates. Earlier when panel was open, the slider knob was at screenshot (183,628) = CSS (91.5,314) — and the config tree earlier (with paintEditor) showed sketch-toolconfig at y=200..320 for 2 rows; with pencil there are 4 rows, so panel is taller: y 200..~345? The slider at CSS y=314 → within. Better approach: while panel open, query the DOM for the slider element (class like sketch-value-slider or input[type=range]) and get exact rect, then drag from knob position to target. Let me do: click new, screenshot; then click pencil, then run_script to dump DOM sliders under toolconfig.
历史思考 16
16/22
New document panel: 宽度 1209, 高度 820, template 颜色 selected, 创建 button at (600,1043). Click 创建 to start a fresh canvas.
历史思考 17
17/22
The panel changed appearance (loaded fully). 创建 button now at (600,1043). Click it again.
历史思考 18
18/22
New blank canvas (mostly; there's a tiny dot at (600,1043) from the click). Canvas area: x from ~100 to 1488, y 0..1202, with horizontal scrollbar at bottom and vertical at right. The document is 1209x820 CSS px, but viewport shows 744x657 CSS with scroll. Screenshot scale 2x. Hmm: document 1209x820 but the visible viewport is 744x657 — so the canvas view is scrolled/zoomed. Wait, the canvas rect earlier: x=50..744, w=694, h=657, bitmapSize 1388x1314 → that suggests canvas displayed at 694x657 CSS with DPR 2. Document is 1209x820, so it's scaled to fit? 694/1209 = 0.574... Actually zoom likely "fit". The screenshot 1488x1202 covers the browser viewport (744x601 CSS?). Let me check current viewport dims. Earlier viewport was 744x657. Screenshot 1488x1202 → CSS 744x601. Hmm, close enough. Important: coordinates I used earlier for the circle (500,880 r135) landed correctly in the visible canvas, so screen coords work fine. I'll draw within x 100..1480, y 30..1150. Note the dot at (600,1043) — a stray dot. I can leave it or it may look like a speck. Let's remove later by... hmm. Undo would remove it: currently it's the only stroke. Let's do Meta+Z once to clear it. Then set brush size. Steps: click pencil icon (opens config), then find slider via DOM and drag precisely. Actually alternative: set stroke width by clicking on the "2px" input and typing a number? The 线宽 row has a sketch-input with contenteditable. If I click its text, maybe it becomes editable. Let's try: open panel, click on "2px" text (CSS ~ (250,280) → screenshot (500,560)); earlier that opened a fill color picker though. Hmm, in the earlier screenshot (panel with 4 rows), the 线宽 row was at y≈560 with "2px" label box at x≈460-551. And the dropdown arrow at x≈523? Actually rows: 填充 (y 320-400) with 0% and arrow at 523; 描边 (y 430-520) with 100% and arrow at 523; 线宽 (y 530-600) with "2px" box at 460-551. Earlier I clicked (523,560) → color picker appeared with a green swatch #CEF28F. That was weird; maybe it opened the 描边 color picker due to layout shift? Whatever. Safest: use the slider. When panel is open, the slider element in DOM. Let me query DOM for elements with class containing 'slider' or 'range' inside the popout, get their rects in CSS, then drag knob. Actually simpler: the document-relative canvas coordinate mapping: the canvas is displayed at scale... Let me not worry. Let me: undo dot, open pencil panel, dump DOM sliders.
历史思考 19
19/22
Now dump DOM for slider under sketch-toolconfig, and get its rect.
历史思考 20
20/22
Now panel top y=6 (shifted up since it's near top). The 线宽 row at y=268..338, slider `sketch-range` at CSS (70,305) w=214 h=30. Knob presumably at left end for value 2px (maybe min 1). Track from ~78 to ~276. Screenshot coords = CSS × 2. So slider track: y≈610, x from 140 to 560. Knob at ~ (183, 628)? Earlier knob was at CSS 91.5 → offset 21 from 70. Hmm. I want width ~6-7px. If range is 1..30 across 214 px (usable ~198), value 7 → offset ≈ 6/29*198 ≈ 41 → CSS x = 70+21+41 = 132 → screenshot 264. Let me drag from CSS(91.5,315)→ screenshot (183,630) to screenshot (264,630), then verify the label text via DOM. Actually better: get the knob rect from DOM (sketch-range likely has a child knob). Let's just do the drag and check the value text after.
历史思考 21
21/22
Width jumped to 21px — too thick (the slider is very sensitive, maybe logarithmic). Range likely 1-30? Since 40px screenshot movement → 21px, maybe range 1..100? offset 40 screenshot = 20 CSS. Hmm 2→21 with 20 CSS px movement... that suggests range 1..30 over 198px? 19 values over 20px = 1 per px. Yes! Range 1..30 over ~198 px → 1px per px. So for ~6px: knob should move 4 CSS px from start (x=91.5 → 95.5) = screenshot 191. Let's drag back from current knob (screenshot ~262) to 191. Wait current knob at CSS 131 (screenshot 262). Target 6px → CSS 95.5, screenshot 191. Let's drag 262→191. Then check value. Actually maybe 5px is good: CSS 94.5. Let's aim and verify.
最近思考
22/22
4.54px — good for a sketch line (at 2x display it's ~9 screenshot px). Maybe 5px would be nicer. Let's nudge: 4.54 is fine. Let's target ~5.5 for a bolder look. Hmm, pencil at 4.5px with taper. I'll go with ~5: drag from 191 to 195 → +2 CSS px ≈ +2.26? Let's compute scale: from 2 to 4.54 with 4 CSS px → 0.635/px. So 1 CSS px ≈ 0.635px width... Wait 2→4.54 is 2.54 over 4 CSS px. Nonlinear. Fine, current 4.54 good enough.

Now close panel (Escape) and start drawing. But careful: Escape may close the popout; drawing then happens with panel closed. Good.

Actually, hmm — with a thicker brush, the tapered ends with overlap should look continuous.

But wait: does the pencil have taper (stroke width varies)? Sketch.io's default pencil brush may have pressure-like taper. Fine, it gives a hand-drawn feel.

Also — should I worry about stray "click dot"? I undid it earlier. Now the canvas should be blank.

Now design the drawing carefully in screenshot coords (1488x1202). Drawing area: x 110..1470, y 30..1130 (scrollbars at right x≈1475 and bottom y≈1170).

Let me lay out the composition (aiming centered, well proportioned):

Bicycle (side view, facing right):
- Rear wheel center: (430, 880), radius 150
- Front wheel center: (1010, 880), radius 150
- Wheel outlines: circle with 3 segments per quarter? Use 28 segments with overlap for smoothness.
- Tire: single stroke circle is fine.
- Hubs: small circles r=10 at centers.
- Spokes: 6-8 lines per wheel from hub to rim (thin, but same brush; ok).
- Frame lines:
  - Rear hub (430,880) → bottom bracket (760,880): chainstay
  - Rear hub → seat top (640,660): seat stay
  - Seat top (640,660) → bottom bracket (760,880): seat tube... wait, seat tube goes from bottom bracket up to seat.
  - Let me define: seat tube top T=(620,650); bottom bracket B=(770,880); head tube top H=(1000,630); head tube bottom Hb=(1030,700)?? Simplify: head tube from (985,610) to (1010,690)... Actually let's use a simple diamond frame:
    - B (770,880) → T (625,650)  [seat tube]
    - T → H (1005,640) [top tube]
    - B → H (1005,640)? That's down tube: B(770,880) → Hhead(1020,700) then head tube up to (1005,640).
    Let me set head junction: Ht=(1000,620) (handlebar stem base / top of head tube), Hb=(1015,690) (bottom of head tube where fork attaches).
    - top tube: T(625,650) → Ht(1000,620)
    - down tube: B(770,880) → Hb(1015,690)
    - head tube: Ht(1000,620) → Hb(1015,690)
    - fork: Hb(1015,690) → front hub (1010,880) — slightly curved, just a straight line ok: (1015,690)→(1010,880)? Front hub center x should be under fork. Set front wheel center (1010,880). Good, fork nearly vertical.
    - seat stays: T(625,650) → rear hub (430,880)
    - chain stays: B(770,880) → rear hub (430,880)
  - Seat: line from (585,635) to (680,628), with small post from T to seat: (625,650)→(620,632).
  - Handlebar: from Ht(1000,620) up to (1010,565) then a curve bar extending forward: (1010,565) → (1075,555) and back to (960,558) — draw a simple bar: horizontal short line (965,560)-(1070,555) plus stem (1000,620)-(1015,562).
  - Cranks/pedals: bottom bracket circle r=18 at B; crank line to pedal at (700,960)? Let's put pedals: near crank (770,880), one pedal at (720,930) and another at (820,835).
  - Chain ring: circle r=30 at B.

Pelican (sitting on the seat, leaning forward, facing right):
Body: big oval centered (720, 520) rx 130, ry 105? But body must sit on seat at T area (620,650). Seat top y≈630. Body bottom should be ~y=660 near seat. So body center y ≈ 560, ry ≈ 100 → bottom 660, top 460.

Let me place: body ellipse center (700,545), rx 135, ry 105 (tilted slightly). Draw as smooth closed curve with 30 segments.

Tail: from body back-left (575,570) a few feathers: lines to (505,540), (500,575), (505,605).

Neck: pelican has thick neck curving up from body front-top (800,470) to head at (940,330). Draw as two parallel curves:
- outer: (810,460) → (880,400) → (925,345)
- inner: (770,500) → (850,440) → (905,380)
Hmm simpler: draw neck as a tapered tube: path from (790,485) up to (900,370) with width. Since brush is uniform width, I'll draw two approximately parallel lines:
  left line: (765,500) → (790,420) → (855,360)
  right line: (840,520) → (860,430) → (930,375)
And close at head.

Let me simplify with a smoother plan: Use a neck as a quadratic curve made of 2 strokes offset vertically.

Head: circle center (955,330), r=48.
Beak: pelican's huge beak: upper mandible from (995,320) to (1180,360) (long, slightly down-curved), lower mandible/pouch: from (995,350) curving down to (1010,395) then forward to (1175,368). Actually pouch hangs: from head bottom (990,360) sag to (1090,430) and up to tip (1180,365). That yields the classic pelican pouch.

Let me detail:
- Upper beak top edge: (990,315) → (1185,352) — with a slight hook at tip.
- Beak tip: (1185,352) → (1178,368)
- Pouch (lower): (1178,368) → curve through (1090,425) → (1000,375)
- So beak formed by two strokes.

Eye + sunglasses: two dark lenses r≈22 circles centered (930,318) and (985,322)? Head r=48 centered (955,330) → lens positions: left lens center (932,320), right lens center (988,326)? Hmm head is a circle; lenses should be on the front-facing side. For a side view with head facing right, we see one lens mostly plus a sliver of the other. Let's do: lens1 center (925,322) r=26, lens2 center (985,330) r=22 (foreshortened), plus bridge line connecting, plus temple arm going back to (900,325)...

Fill lenses with hatching? Simpler: draw lens circles and hatch with 3-4 diagonal lines each. Since brush is 4.5px, hatching inside r=24 lens: lines at y offsets. Might look messy at that size. Alternative: draw thicker inner circle? I could temporarily increase brush? Multiple concentric circles at r=26 and r=20 gives a "ring" look, not dark.

Better: fill by drawing a small zigzag: 4 short diagonal strokes inside each lens. At 2x display, lens is 52px wide in screenshot; diagonal hatch lines spaced ~8 screenshot px would need ~6 strokes. Doable and looks like dark lens.

Wing: on the body, a wing shape: curve from (640,470) sweeping to (790,560) and back — like an arc. Plus a few feather lines. Maybe the wing reaches forward to the handlebar (grip at (1070,555)), suggesting it's holding on. Nice touch: wing tip near handlebar.

Legs: pelican legs to pedals: from body bottom (740,640) → knee (780,760) → foot (810,835) on pedal. And second leg (700,645) → (700,800) → (700,930)? Only two legs; one forward one back. Since side view, draw both legs: front leg to forward pedal (820,838), back leg to rear pedal (720,928).

Feet: webbed — 3 short lines at each pedal.

Ground line? Optional; skip to keep clean. Maybe add a subtle line under wheels for context. Sketch style; and maybe a couple of motion lines behind. Let's skip motion lines but add a light ground stroke under the bike? It'd be nice: a horizontal line from (200,1035) to (1250,1035). Wheels bottom at y=1030. Good, ground at 1035.

Wheels radius 150, center y=880 → bottom 1030. ✓.

Also need handlebar to look like a bike handlebar: from stem top (1005,562) draw a bar going right-back: (1005,562) → (1065,553) with a grip end, and a small curve down (1065,553) → (1075,568).

Total strokes estimate: wheels 2×(28 with overlap ~32) = 64, spokes 12, frame 10, drive 4, pelican body 30, head 20, neck 4, beak 3, lenses 20 (hatch), legs 6, feet 6, wing 3, tail 3, ground 1 → ~180 drag calls. Earlier 36 drags took ~3.9s → ~110ms each; 180 → ~20s. Fine.

Overlap approach for circles: use segments of arc with overlap: e.g., 36 segments each covering 12° (i.e., step 10°, chord spans 10°)... Simpler: generate points at step angle; each drag from p[i] to p[i+2] (skipping one) so consecutive chords overlap by 50%. That doubles coverage. With 36 points step 10°, chords spanning 20° = length 2*r*sin(10°) = 0.347r = 52px for r=150 — that might look polygonal. Hmm.

Better: use step 6° (60 points) with each drag spanning 12° (2 steps). Chord for 12° at r=150: 2*150*sin(6°)=31px ≈ 3 chords per 90°... Fine, small deviation from circle: sagitta = r*(1-cos(6°)) = 0.82px. Negligible.

60 points, 60 drags per circle = 120 drags total. ~13s. Acceptable.

Hmm, but each stroke is a separate object with taper → the overlaps create slightly blobby joints; acceptable hand-drawn look.

Actually wait: is the taper strong? Looking at the 36-segment circle, strokes appeared as dashes with clear gaps — meaning significant taper at both ends. With 2-step overlap (each chord 12°, next chord starts at 6°), the tapered parts overlap the neighbor's thick middle. Good.

Let me now also think about whether the strokes are actually curved-smooth. Each freehand stroke has 2 points → straight line. OK.

Let me write a general drawing script with helper functions:

- line(x1,y1,x2,y2): one drag
- poly(points): for each consecutive pair, drag
- circleWire(cx,cy,r,steps=60,span=2): drags
- ellipseWire(cx,cy,rx,ry,rot,steps): param points, chord overlap

For organic shapes (body, beak), I'll define point arrays manually with enough points and use `curve(points, smooth)` — Catmull-Rom interpolation to generate dense points, then draw with overlapping chords.

Let me write a Catmull-Rom → sample function, then draw each sampled segment as a drag (points spaced ~12px, overlapping by starting each drag one point earlier).

Implementation detail: to reduce number of drags for organic curves, spacing of 15px with overlap of 1 point is fine.

Let's code:

```js
const P = (x,y)=>({x,y});
function catmullRom(pts, samplesPerSeg=8, closed=false) { ... }
```

Given time, let me build:

1. bike frame lines (straight, few)
2. wheels (circles)
3. spokes
4. pelican body (closed smooth curve through control points)
5. neck (two strokes)
6. head (circle) + beak (curves) + crest
7. sunglasses
8. wing
9. tail
10. legs + feet
11. ground

Order: draw pelican first then bike? Overlap: pelican sits on seat, legs over frame, wing over handlebar. Bike first then pelican is better (pelican in front). But legs should be in front of frame — yes pelican after.

Actually the rear wheel is behind the pelican's body — the body sits above the wheel, fine either way.

Now control points for body (closed smooth):
Let's define the pelican body as a plump oval, tilted:
center (700,545), rx 140, ry 108, but let me hand-tune a closed curve:
- (830,470) front-top
- (790,455)
- (700,455) top
- (615,480)
- (570,540) back
- (585,610)
- (650,660) bottom-front (belly over seat)
- (740,665)
- (805,630)
- (835,560)
- (830,470)
Hmm the belly should rest on the seat at y≈640. Seat at y≈630. Body bottom 665 slightly overlapping seat — good.

Wait but the seat is at T=(625,650) with seat line (585,635)-(680,628). Body bottom center x ~730 sits on seat right end... Let me shift the body a bit right: body spans x 570..835, seat spans 585..680. Body bottom at 665 vs seat top 628. So body overlaps seat and the seat is partially hidden. That's fine — looks like sitting.

Hmm, maybe better: place seat so it's visible: seat at y=660? Let me shift the pelican up: body bottom at 640, seat at 645. Let's adjust: body center y=520, ry ~100 → bottom 620. Seat line y=630 spanning (580..690). Then body bottom (620) just above seat (630) — but the pelican should visually sit on it, slight overlap is fine. Let's use body bottom 635.

Simplify: I'll set body control points and accept approximate.

Body closed curve points:
p1 (835,455)
p2 (760,440)
p3 (665,452)
p4 (592,505)
p5 (565,575)
p6 (595,640)
p7 (680,668)
p8 (770,650)
p9 (822,590)
p10 (840,510)
closed.

Hmm p6-p7 bottom near y 640-668.

Neck: from body top-front (790,470) curving up-forward to head bottom (940,375):
left edge: (770,470) → (790,415) → (830,375) → (880,352)
right edge: (845,480) → (860,425) → (895,382) → (940,362)
Head circle center (955,325) r=50 → bottom 375. OK, neck connects at (900-950, 360-375).

Neck width ~55 at base, ~45 at top. Points above give roughly that.

Head: circle c=(955,322), r=50. But head+beak: pelican head is smaller relative to beak. ok.

Beak: upper mandible from (990,300) → (1180,340); the beak base is at head front-right (990-1000, 300-345).
- Upper: (992,298) → (1060,305) → (1130,320) → (1185,342)
- Tip hook: (1185,342) → (1178,358)
- Pouch: (1178,358) → (1120,400) → (1050,425) → (1008,395) → (1000,350) → (995,330) close to head.

Sunglasses: head center (955,322). Lenses on the front/right side of head:
- lens1 (front, bigger): center (985,315), r=27
- lens2 (back, foreshortened): center (925,313), r=20 (elliptical: rx 16, ry 20)
Bridge: line (968,310)-(972,310)?? Bridge connects lens1 left edge (958) to lens2 right edge (941) at y≈308: line (941,306)-(958,306).
Temple: from lens2 left edge (909,308) backward to (890,315).
Hatch fills: inside lens1 draw 3 diagonal strokes from top-left to bottom-right: e.g. lines (968,296)-(1000,334), (978,292)-(1008,326), (988,292)-(1012,318)? Careful to stay inside circle r=27 centered (985,315): points must satisfy distance ≤ 24.
Let me generate hatch programmatically: for each lens, for offsets, clip line to circle.

I'll write a helper: hatchCircle(cx,cy,r,n) that draws n diagonal chords inside radius r*0.8.

That gives dark lens look.

Wing: arc on body: from (660,500) curve down-front (720,560) to (790,600) then a second line above: (665,470)→(730,520)→(800,555)? Wing looks like a folded wing with feather tips at back-bottom. Let's draw:
- wing outline: (640,480) → (700,470) → (770,505) → (810,560) then feather tips: (810,560) → (780,585) → (750,570)...
Simplify: draw wing as closed-ish shape:
  (630,485) → (700,462) → (775,495) → (805,545) → (795,585) → (745,588) → (690,545) → (645,520) → back to (630,485)?
Hmm this may look like a lump. Alternatively draw a single sweeping curve for the wing (like a wing line) plus 3 short feather strokes at the end. Simpler and cleaner:
  wing curve: (620,470) → (690,455) → (760,490) → (800,540)
  feather strokes: from (800,540) three short lines going back-left-down: (800,540)→(760,570); (795,530)→(752,556); (788,520)→(745,542)?
Eh.

Also, wing reaching to handlebar: add an extended wing "arm" from body top-front (790,480) to handlebar grip (1060,556): a curve (800,485) → (900,510) → (1000,535) → (1050,550). Then a small hand/wing tip. This conveys holding the bar. Nice.

But wait: the neck also goes up from body front, and the wing reaches forward-down. Both plausible.

Legs: from belly bottom:
- front leg: (770,640) → (800,730) → (815,830) then foot at pedal (820,838)
- back leg: (700,655) → (700,760) → (720,915) foot at pedal (720,925)
Feet: 3 lines each: from ankle (820,835): to (795,850), (825,855), (850,845).

Pedals: crank lines from B (770,880): to (820,838)?? Hmm crank from bottom bracket to pedal: B(770,880) → (825,835) (forward-up pedal) and B → (715,925) (back-down pedal). Both 78 long. And chainring circle r=28 at B.

Pedal plates: short lines perpendicular at pedal points: at (825,835) draw line (818,842)-(838,830)? Keep simple: small line.

Ground: (200,1042) → (1250,1042).

Saddle: (575,640) → (695,652)? Slightly thick: one line (575,638)-(690,650). Plus seat post (625,650)... wait T was (625,650) and body bottom overlaps.

Let me finalize frame geometry with the new numbers:
- Rear hub: RH (430,880), r=150 → bottom 1030 ✓
- Front hub: FH (1010,880), r=150 → bottom 1030 ✓
- Bottom bracket B (770,880)
- Seat tube top T (632,655) — seat at y~645
- Head tube top Ht (1000,625)
- Head tube bottom Hb (1018,695)
- Frame strokes:
  1. B → RH (chainstay)
  2. T → RH (seat stay)
  3. B → T (seat tube)
  4. T → Ht (top tube)  [passes above the pelican body? body spans y 440..668, top tube at y 625-655 from x 632..1000 → it would cut through the body/belly region. The pelican body covers x 565..840 at y up to 668. So top tube would be visible crossing under/behind body — since body drawn after, it covers it. Good.]
  5. B → Hb (down tube)
  6. Ht → Hb (head tube)
  7. Hb → FH (fork)
- Handlebar: Ht → (1012,565) [stem]; bar: (1012,565) → (1070,552); grip: (1070,552)→(1078,566)
  Also a left-side bar hint: (1012,565) → (975,558).

Hmm, handlebar should be at the front top; the pelican's wing reaches (1050,550) near it. OK.

- Saddle: line (570,642)→(692,650); saddle post: (632,655)→(632,650) trivial, skip.

Wheels spokes: 8 per wheel: from hub to rim at angles.

Rim: circle r=150; also draw inner rim circle r=135? Two circles might be heavy. Just outer tire + spokes. Maybe draw a thin hub circle r=12.

Now the pelican details: total.

Also add a fish in the pouch? Cute but optional. Skip.

Let me write the code with helpers, execute in stages and screenshot at the end. Given the size, I'll do 1-2 runs: first bike, check screenshot; then pelican.

Actually to reduce risk, do: run1 = bike (wheels, spokes, frame, drive, saddle, handlebar, ground). Screenshot. run2 = pelican. Screenshot.

Coordinates in screenshot pixel space (1488x1202) — act_on_screen uses these directly. Good.

One risk: canvas has a horizontal scrollbar; drawing near bottom y>1160 might hit scrollbar. Ground at 1042 fine.

Let me write run 1.

Circle function with overlap: step = 2π/steps; for i in 0..steps-1: a = i*step, b = (i+2)*step. That means each drag spans 2 steps and next starts 1 step later → 50% overlap.

With steps=48 (7.5°), chord 15° = 39px for r=150 — sagitta r*(1-cos7.5°)=1.28px. fine. Number of drags = 48 per circle → 96 for two. Hmm plus others ~130 drags ≈ 15s. OK.

Maybe steps=40 → chord 18°=47px, sagitta 1.8px. Acceptable, hand-drawn.

I'll use steps=44.

Let me write the code.

Also note: each drag ~110ms; total maybe 20s. Set timeout 300.

I'll build a list of operations (arrays of points) then execute sequentially with progress trace.

Code:

```js
async () => {
  const log = [];
  const wait = ms => new Promise(r => setTimeout(r, ms));
  const drag = async (a, b) => {
    const r = await tools.act_on_screen({action:"drag", x:+a.x.toFixed(1), y:+a.y.toFixed(1), endX:+b.x.toFixed(1), endY:+b.y.toFixed(1), returnScreenshot:false});
    if (r && r.coordinateBasisReady === false) throw new Error("basis lost");
  };
  let n = 0;
  const stroke = async (pts) => {
    for (let i=0;i<pts.length-1;i++) { await drag(pts[i], pts[i+1]); n++; }
  };
  const line = async (x1,y1,x2,y2) => { await drag({x:x1,y:y1},{x:x2,y:y2}); n++; };
  const circlePath = (cx,cy,r,steps=44) => { const out=[]; for(let i=0;i<=steps+2;i++){const a=-Math.PI/2+2*Math.PI*i/steps; out.push({x:cx+r*Math.cos(a), y:cy+r*Math.sin(a)});} return out; };
  const wcircle = async (cx,cy,r,steps=44) => {
    const pts = circlePath(cx,cy,r,steps);
    for (let i=0;i<steps;i++){ await drag(pts[i], pts[i+2]); n++; }
  };
  ...
}
```

Careful: circlePath with steps+3 points where i goes to steps+2 ensures wrap.

Bike drawing ops. Let's go.

Wheels: wcircle(430,880,150), wcircle(1010,880,150).
Hubs: wcircle(430,880,14,12), wcircle(1010,880,14,12) — small circles with 12 steps, chord span 60° → too coarse; use steps 20 and drag i→i+1 (no overlap) - for r=14 fine. I'll make a helper wcircle2 with span1.

Spokes: 8 lines: angle k*45°, from hub r=14 to rim r=146.

Frame lines as above.

Chain ring: wcircle(770,880,30,24).
Cranks: line(770,880, 828,838); line(770,880, 712,922).
Pedals: line(818,846, 840,830); line(702,930, 724,914).

Saddle: line(570,642, 692,650).

Saddle post: line(632,652, 640,660)? minimal, skip.

Handlebar: Ht(1000,625) → (1012,566); bar (1012,566)→(1072,553); grip (1072,553)→(1080,568); left nub (1012,566)→(978,560).

Ground: line(190,1044, 1260,1044).

Let me write it.

Then screenshot.

One more consideration: the pencil might have smoothing that makes short chords render oddly, but fine.

Let's execute.
运行代码
async () => {
// 在 sketch.io 画布上用鼠标拖拽画后轮,验证弦段逼近圆的效果
const segs = 36;
const cx = 500, cy = 880, r = 135;
const pts = [];
for (let i = 0; i <= segs; i++) {
const a = (Math.PI * 2 * i) / segs - Math.PI / 2;
pts.push({ x: cx + r * Math.cos(a), y: cy + r * Math.sin(a) });
}
let ok = 0;
for (let i = 0; i < segs; i++) {
const a = pts[i], b = pts[i + 1];
const res = await tools.act_on_screen({ action: "drag", x: a.x, y: a.y, endX: b.x, endY: b.y, returnScreenshot: false });
if (res && res.coordinateBasisReady === false) return { ok: false, at: i, res };
ok++;
}
await tools.screenshot({ format: "jpeg", quality: 80 });
return { ok: true, strokes: ok };
}trace
tool.start
07:08:48
tool.end
07:08:48
tool.start
07:08:48
tool.end
07:08:48
tool.start
07:08:48
tool.end
07:08:48
tool.start
07:08:48
tool.end
07:08:48
tool.start
07:08:48
tool.end
07:08:48
tool.start
07:08:48
tool.end
07:08:48
tool.start
07:08:48
tool.end
07:08:48
tool.start
07:08:48
tool.end
07:08:48
tool.start
07:08:48
tool.end
07:08:49
tool.start
07:08:49
tool.end
07:08:49
tool.start
07:08:49
trace
result
{
"ok": true,
"strokes": 36
}
运行代码
async () => {
// 探查 sketch.io 的画笔大小/颜色控件,便于加粗线条
const out = { stage: "scan" };
const cands = [...document.querySelectorAll('[class*="size"],[class*="brush"],[class*="width"],[data-tooltip],[title]')].slice(0, 60).map(el => ({
tag: el.tagName, cls: (el.className && el.className.toString().slice(0, 60)) || "", title: el.getAttribute("title") || "", tip: el.getAttribute("data-tooltip") || "", txt: (el.textContent || "").trim().slice(0, 30)
}));
out.cands = cands;
out.inputs = [...document.querySelectorAll("input")].map(i => ({ type: i.type, name: i.name, id: i.id, cls: i.className, min: i.min, max: i.max, value: i.value, style: (i.getAttribute("style") || "").slice(0, 80) }));
return out;
}result
{
"cands": [
{
"cls": "",
"tag": "SKETCH-TOOL",
"tip": "select",
"title": "",
"txt": ""
},
{
"cls": "",
"tag": "SKETCH-TOOL",
"tip": "crop",
"title": "",
"txt": ""
},
{
"cls": "selected",
"tag": "SKETCH-TOOL",
"tip": "pencil",
"title": "",
"txt": ""
},
{
"cls": "",
"tag": "SKETCH-TOOL",
"tip": "star",
"title": "",
"txt": ""
},
{
"cls": "",
"tag": "SKETCH-TOOL",
"tip": "clipart",
"title": "",
"txt": ""
},
{
"cls": "",
"tag": "SKETCH-TOOL",
"tip": "text",
"title": "",
"txt": ""
},
{
"cls": "",
"tag": "SKETCH-TOOL",
"tip": "paintEditor",
"title": "",
"txt": ""
},
{
"cls": "",
"tag": "SKETCH-TOOL",
"tip": "new",
"title": "",
"txt": ""
},
{
"cls": "",
"tag": "SKETCH-TOOL",
"tip": "open",
"title": "",
"txt": ""
},
{
"cls": "",
"tag": "SKETCH-TOOL",
"tip": "exportDocument",
"title": "",
"txt": ""
},
{
"cls": "",
"tag": "SKETCH-TOOL",
"tip": "settings",
"title": "",
"txt": ""
},
{
"cls": "",
"tag": "SKETCH-TOOL",
"tip": "user-guide",
"title": "",
"txt": ""
},
{
"cls": "",
"tag": "CANVAS",
"tip": "",
"title": "batchCanvas0",
"txt": ""
},
{
"cls": "sketch-icon-layers",
"tag": "SKETCH-TOOL",
"tip": "layers",
"title": "",
"txt": ""
},
{
"cls": "sketch-icon-zoom ",
"tag": "SKETCH-TOOL",
"tip": "zoom",
"title": "",
"txt": ""
},
{
"cls": "sketch-icon-history",
"tag": "SKETCH-TOOL",
"tip": "history",
"title": "",
"txt": ""
},
{
"cls": "sketch-icon-undo",
"tag": "SKETCH-TOOL",
"tip": "undo",
"title": "",
"txt": ""
}
],
"inputs": [],
"stage": "scan"
}点击页面 · Sketchpad - Draw, Create, Share!


点击页面 · Sketchpad - Draw, Create, Share!


点击页面 · Sketchpad - Draw, Create, Share!


按下按键 · Sketchpad - Draw, Create, Share!


运行代码
async () => {
// 枚举左侧工具面板区域的 DOM 元素及其 CSS 矩形,定位画笔类型下拉与线宽滑块
const els = [...document.querySelectorAll("*")];
const out = [];
for (const el of els) {
const r = el.getBoundingClientRect();
if (r.width === 0 || r.height === 0) continue;
if (r.left > 620 || r.top > 720) continue;
if (r.width > 600 && r.height > 600) continue;
const cls = (el.className && el.className.toString) ? el.className.toString().slice(0, 40) : "";
out.push({ tag: el.tagName.toLowerCase(), id: el.id || "", cls, x: Math.round(r.left), y: Math.round(r.top), w: Math.round(r.width), h: Math.round(r.height), tip: el.getAttribute("data-tooltip") || el.getAttribute("title") || "" });
}
return { count: out.length, els: out.slice(0, 120), shadowHosts: [...document.querySelectorAll("*")].filter(e => e.shadowRoot).map(e => e.tagName + "." + (e.className||"")).slice(0, 20) };
}result
{
"count": 53,
"els": [
{
"cls": "",
"h": 120,
"id": "",
"tag": "canvas",
"tip": "",
"w": 120,
"x": 312,
"y": 241
},
{
"cls": "",
"h": 601,
"id": "",
"tag": "sketch-toolbar",
"tip": "",
"w": 50,
"x": 0,
"y": 0
},
{
"cls": "top",
"h": 280,
"id": "",
"tag": "sketch-toolgroup",
"tip": "",
"w": 50,
"x": 0,
"y": 0
},
{
"cls": "",
"h": 40,
"id": "",
"tag": "sketch-tool",
"tip": "select",
"w": 49,
"x": 0,
"y": 0
},
{
"cls": "sketch-icon-select",
"h": 40,
"id": "",
"tag": "sketch-tool-icon",
"tip": "",
"w": 49,
"x": 0,
"y": 0
},
{
"cls": "",
"h": 40,
"id": "",
"tag": "sketch-tool",
"tip": "crop",
"w": 49,
"x": 0,
"y": 40
},
{
"cls": "sketch-icon-crop",
"h": 40,
"id": "",
"tag": "sketch-tool-icon",
"tip": "",
"w": 49,
"x": 0,
"y": 40
},
{
"cls": "",
"h": 40,
"id": "",
"tag": "sketch-tool",
"tip": "pencil",
"w": 49,
"x": 0,
"y": 80
},
{
"cls": "sketch-icon-pencil",
"h": 39,
"id": "",
"tag": "sketch-tool-icon",
"tip": "",
"w": 49,
"x": 0,
"y": 81
},
{
"cls": "",
"h": 40,
"id": "",
"tag": "sketch-tool",
"tip": "star",
"w": 49,
"x": 0,
"y": 120
},
{
"cls": "sketch-icon-star",
"h": 40,
"id": "",
"tag": "sketch-tool-icon",
"tip": "",
"w": 49,
"x": 0,
"y": 120
},
{
"cls": "",
"h": 40,
"id": "",
"tag": "sketch-tool",
"tip": "clipart",
"w": 49,
"x": 0,
"y": 160
},
{
"cls": "sketch-icon-clipart",
"h": 40,
"id": "",
"tag": "sketch-tool-icon",
"tip": "",
"w": 49,
"x": 0,
"y": 160
},
{
"cls": "",
"h": 40,
"id": "",
"tag": "sketch-tool",
"tip": "text",
"w": 49,
"x": 0,
"y": 200
},
{
"cls": "sketch-icon-text",
"h": 40,
"id": "",
"tag": "sketch-tool-icon",
"tip": "",
"w": 49,
"x": 0,
"y": 200
},
{
"cls": "selected sketch-opened",
"h": 40,
"id": "",
"tag": "sketch-tool",
"tip": "paintEditor",
"w": 49,
"x": 0,
"y": 240
},
{
"cls": "sketch-icon-paintEditor",
"h": 49,
"id": "",
"tag": "sketch-tool-icon",
"tip": "",
"w": 61,
"x": -6,
"y": 236
},
{
"cls": "bottom",
"h": 200,
"id": "",
"tag": "sketch-toolgroup",
"tip": "",
"w": 50,
"x": 0,
"y": 401
},
{
"cls": "",
"h": 40,
"id": "",
"tag": "sketch-tool",
"tip": "new",
"w": 49,
"x": 0,
"y": 401
},
{
"cls": "sketch-icon-add",
"h": 39,
"id": "",
"tag": "sketch-tool-icon",
"tip": "",
"w": 49,
"x": 0,
"y": 402
},
{
"cls": "",
"h": 40,
"id": "",
"tag": "sketch-tool",
"tip": "open",
"w": 49,
"x": 0,
"y": 441
},
{
"cls": "sketch-icon-open",
"h": 40,
"id": "",
"tag": "sketch-tool-icon",
"tip": "",
"w": 49,
"x": 0,
"y": 441
},
{
"cls": "",
"h": 40,
"id": "",
"tag": "sketch-tool",
"tip": "exportDocument",
"w": 49,
"x": 0,
"y": 481
},
{
"cls": "sketch-icon-save",
"h": 40,
"id": "",
"tag": "sketch-tool-icon",
"tip": "",
"w": 49,
"x": 0,
"y": 481
},
{
"cls": "",
"h": 40,
"id": "",
"tag": "sketch-tool",
"tip": "settings",
"w": 49,
"x": 0,
"y": 521
},
{
"cls": "sketch-icon-settings",
"h": 39,
"id": "",
"tag": "sketch-tool-icon",
"tip": "",
"w": 49,
"x": 0,
"y": 522
},
{
"cls": "",
"h": 40,
"id": "",
"tag": "sketch-tool",
"tip": "user-guide",
"w": 49,
"x": 0,
"y": 561
},
{
"cls": "sketch-icon-user-guide",
"h": 39,
"id": "",
"tag": "sketch-tool-icon",
"tip": "",
"w": 49,
"x": 0,
"y": 562
},
{
"cls": "ps__rail-x",
"h": 15,
"id": "",
"tag": "div",
"tip": "",
"w": 694,
"x": 50,
"y": 586
},
{
"cls": "ps__thumb-x",
"h": 6,
"id": "",
"tag": "div",
"tip": "",
"w": 461,
"x": 149,
"y": 593
},
{
"cls": "sketch-icon-infinity",
"h": 14,
"id": "",
"tag": "sketch-icon-font-preload",
"tip": "",
"w": 14,
"x": 0,
"y": 0
},
{
"cls": "sketch-style-popout",
"h": 120,
"id": "",
"tag": "sketch-popout",
"tip": "",
"w": 226,
"x": 64,
"y": 200
},
{
"cls": "",
"h": 18,
"id": "",
"tag": "sketch-popout-arrow",
"tip": "",
"w": 18,
"x": 45,
"y": 251
},
{
"cls": "",
"h": 120,
"id": "",
"tag": "sketch-popout-content",
"tip": "",
"w": 226,
"x": 64,
"y": 200
},
{
"cls": "",
"h": 120,
"id": "",
"tag": "sketch-toolconfig",
"tip": "",
"w": 226,
"x": 64,
"y": 200
},
{
"cls": "sketch-one-column sketch-SubTool sketch-",
"h": 60,
"id": "",
"tag": "sketch-grid-view-trigger",
"tip": "",
"w": 226,
"x": 64,
"y": 200
},
{
"cls": "sketch-icon-arrow-down",
"h": 55,
"id": "",
"tag": "span",
"tip": "",
"w": 15,
"x": 264,
"y": 201
},
{
"cls": "",
"h": 60,
"id": "",
"tag": "grid-title",
"tip": "",
"w": 115,
"x": 129,
"y": 201
},
{
"cls": "icon sketch-icon-paintEditor",
"h": 60,
"id": "",
"tag": "span",
"tip": "",
"w": 60,
"x": 68,
"y": 201
},
{
"cls": "sketch-paint-triggerLabel",
"h": 60,
"id": "",
"tag": "sketch-label",
"tip": "",
"w": 226,
"x": 64,
"y": 260
},
{
"cls": "",
"h": 22,
"id": "",
"tag": "sketch-title",
"tip": "",
"w": 113,
"x": 64,
"y": 261
},
{
"cls": "sketch-enabled fill-trigger",
"h": 59,
"id": "",
"tag": "sketch-paint-trigger",
"tip": "",
"w": 226,
"x": 64,
"y": 261
},
{
"cls": "sketch-icon-arrow-down",
"h": 55,
"id": "",
"tag": "sketch-arrow-icon",
"tip": "",
"w": 15,
"x": 264,
"y": 261
},
{
"cls": "fill-indicator",
"h": 59,
"id": "",
"tag": "sketch-paint-block",
"tip": "",
"w": 90,
"x": 64,
"y": 261
},
{
"cls": "",
"h": 59,
"id": "",
"tag": "canvas",
"tip": "",
"w": 91,
"x": 64,
"y": 261
},
{
"cls": "",
"h": 59,
"id": "",
"tag": "sketch-opacity-droplet",
"tip": "",
"w": 136,
"x": 154,
"y": 261
},
{
"cls": "opacity-region",
"h": 30,
"id": "",
"tag": "div",
"tip": "",
"w": 26,
"x": 161,
"y": 276
},
{
"cls": "[object SVGAnimatedString]",
"h": 40,
"id": "",
"tag": "svg",
"tip": "",
"w": 40,
"x": 154,
"y": 270
},
{
"cls": "[object SVGAnimatedString]",
"h": 24,
"id": "",
"tag": "rect",
"tip": "",
"w": 20,
"x": 164,
"y": 280
},
{
"cls": "[object SVGAnimatedString]",
"h": 32,
"id": "",
"tag": "path",
"tip": "",
"w": 27,
"x": 161,
"y": 274
},
{
"cls": "[object SVGAnimatedString]",
"h": 29,
"id": "",
"tag": "rect",
"tip": "",
"w": 29,
"x": 160,
"y": 277
},
{
"cls": "",
"h": 59,
"id": "",
"tag": "sketch-input",
"tip": "",
"w": 96,
"x": 154,
"y": 261
},
{
"cls": "",
"h": 59,
"id": "",
"tag": "sketch-input-content",
"tip": "",
"w": 56,
"x": 194,
"y": 261
}
],
"shadowHosts": []
}运行代码
async () => {
// 读取画笔配置面板 sketch-toolconfig 的子树结构与各元素矩形
const cfg = document.querySelector("sketch-toolconfig");
if (!cfg) return { ok: false };
const walk = (el, depth) => {
const r = el.getBoundingClientRect();
const cls = (el.className && el.className.toString) ? el.className.toString().slice(0, 60) : "";
const node = { t: el.tagName.toLowerCase(), c: cls, x: Math.round(r.left), y: Math.round(r.top), w: Math.round(r.width), h: Math.round(r.height), txt: (el.children.length ? "" : (el.textContent || "").trim().slice(0, 30)) };
if (depth < 6 && el.children.length) node.k = [...el.children].map(c => walk(c, depth + 1));
return node;
};
return { html: cfg.outerHTML.slice(0, 4000), tree: walk(cfg, 0) };
}result
{
"html": "<sketch-toolconfig><sketch-grid-view-trigger class=\"sketch-one-column sketch-SubTool sketch-one-column\" tabindex=\"0\"><span class=\"sketch-icon-arrow-down\"></span><grid-title>矢量填充</grid-title>\n\t\t\t\t\t<span class=\"icon sketch-icon-paintEditor\"></span></sketch-grid-view-trigger><sketch-label class=\"sketch-paint-triggerLabel\">\n\t\t\t<sketch-title>填充</sketch-title>\n\t\t<sketch-paint-trigger tabindex=\"0\" data-paint-method=\"fill\" class=\"sketch-enabled fill-trigger\">\n\t\t\t<sketch-arrow-icon class=\"sketch-icon-arrow-down\"></sketch-arrow-icon>\n\t\t\t<sketch-paint-block class=\"fill-indicator\" data-paint-hash=\"b811beba\" style=\"background: url("data:image/webp;base64,UklGRlIAAABXRUJQVlA4IEYAAABwBACdASokACQAPpU4l0gloyIhNVqoALASiWkAAGRoAWXT0H3tv6gM26nQAAD+9/QbbgaGmui7CLMdR4rgygbN50bRwAAA") 0% 0% / 30px auto;\"><canvas width=\"182\" height=\"118\" style=\"opacity: 1;\"></canvas></sketch-paint-block>\n\t\t\t<sketch-painticon class=\"fill-indicator\"></sketch-painticon>\n\t\t\t<sketch-opacity-droplet>\n\t<div class=\"opacity-region\"></div>\n\t<svg class=\"opacity\" xmlns=\"http://www.w3.org/2000/svg\" x=\"0\" y=\"0\" viewBox=\"0 0 768 768\" xml:space=\"preserve\">\n\t\t<defs>\n\t\t\t<clipPath id=\"clipPathID526274034\">\n\t\t\t\t<path d=\"M384,168L249,307.5c-36,36-57,76.5-57,141c18,244.5,373,235.5,384,0C576,384,555,345,519,309L384,168z\"></path>\n\t\t\t</clipPath>\n\t\t</defs>\n\t\t<rect class=\"value\" x=\"192\" width=\"384\" height=\"460.5\" style=\"clip-path: url("#clipPathID526274034"); y: 195;\"></rect>\n\t\t<path class=\"outline\" d=\"M192,448.5c18,244.5,373,235.5,384,0C576,384,555,345,519,309L384,168L249,307.5C213,343.5,192,384,192,448.5zM565.5,256.5c49.5,49.5,75,115.5,75,180s-25.5,132-75,181.5S450,693,384,693s-132-25.5-181.5-75s-75-117-75-181.5 s25.5-130.5,75-180L384,75L565.5,256.5z\"></path>\n\t\t<rect class=\"strikethrough\" x=\"22.3\" y=\"383\" transform=\"matrix(0.7071 -0.7071 0.7071 0.7071 -180.2966 390.7326)\" width=\"718.4\" height=\"75\" style=\"opacity: 0;\"></rect>\n\t</svg>\n<sketch-input data-type=\"number\">\n\t\t\t\t<sketch-input-content contenteditable=\"true\" tabindex=\"0\" inputmode=\"decimal\">100%</sketch-input-content><sketch-input-arrows>\n\t\t\t<sketch-input-arrow-up></sketch-input-arrow-up>\n\t\t\t<sketch-input-arrow-down></sketch-input-arrow-down>\n\t\t</sketch-input-arrows></sketch-input></sketch-opacity-droplet>\n\t\t</sketch-paint-trigger></sketch-label></sketch-toolconfig>",
"tree": {
"c": "",
"h": 120,
"k": [
{
"c": "sketch-one-column sketch-SubTool sketch-one-column",
"h": 60,
"k": [
{
"c": "sketch-icon-arrow-down",
"h": 55,
"t": "span",
"txt": "",
"w": 15,
"x": 264,
"y": 201
},
{
"c": "",
"h": 60,
"t": "grid-title",
"txt": "矢量填充",
"w": 115,
"x": 129,
"y": 201
},
{
"c": "icon sketch-icon-paintEditor",
"h": 60,
"t": "span",
"txt": "",
"w": 60,
"x": 68,
"y": 201
}
],
"t": "sketch-grid-view-trigger",
"txt": "",
"w": 226,
"x": 64,
"y": 200
},
{
"c": "sketch-paint-triggerLabel",
"h": 60,
"k": [
{
"c": "",
"h": 22,
"t": "sketch-title",
"txt": "填充",
"w": 113,
"x": 64,
"y": 261
},
{
"c": "sketch-enabled fill-trigger",
"h": 59,
"k": [
{
"c": "sketch-icon-arrow-down",
"h": 55,
"t": "sketch-arrow-icon",
"txt": "",
"w": 15,
"x": 264,
"y": 261
},
{
"c": "fill-indicator",
"h": 59,
"k": {
"__qz_truncated": true,
"type": "array"
},
"t": "sketch-paint-block",
"txt": "",
"w": 90,
"x": 64,
"y": 261
},
{
"c": "fill-indicator",
"h": 0,
"t": "sketch-painticon",
"txt": "",
"w": 0,
"x": 64,
"y": 261
},
{
"c": "",
"h": 59,
"k": {
"__qz_truncated": true,
"type": "array"
},
"t": "sketch-opacity-droplet",
"txt": "",
"w": 136,
"x": 154,
"y": 261
}
],
"t": "sketch-paint-trigger",
"txt": "",
"w": 226,
"x": 64,
"y": 261
}
],
"t": "sketch-label",
"txt": "",
"w": 226,
"x": 64,
"y": 260
}
],
"t": "sketch-toolconfig",
"txt": "",
"w": 226,
"x": 64,
"y": 200
}
}点击页面 · Sketchpad - Draw, Create, Share!


按下按键 · Sketchpad - Draw, Create, Share!


点击页面 · Sketchpad - Draw, Create, Share!


按下按键 · Sketchpad - Draw, Create, Share!

拖动页面 · Sketchpad - Draw, Create, Share!


按下按键 · Sketchpad - Draw, Create, Share!


点击页面 · Sketchpad - Draw, Create, Share!


点击页面 · Sketchpad - Draw, Create, Share!


点击页面 · Sketchpad - Draw, Create, Share!


点击页面 · Sketchpad - Draw, Create, Share!


按下按键 · Sketchpad - Draw, Create, Share!


点击页面 · Sketchpad - Draw, Create, Share!


运行代码
async () => {
// 定位画笔面板中线宽滑块的精确位置(CSS 坐标)
const cfg = document.querySelector("sketch-toolconfig");
if (!cfg) return { ok: false, reason: "no config" };
const all = [...cfg.querySelectorAll("*")];
const rows = all.filter(el => {
const r = el.getBoundingClientRect();
return r.width > 40 && r.height > 8;
}).map(el => {
const r = el.getBoundingClientRect();
return { t: el.tagName.toLowerCase(), c: (el.className && el.className.toString) ? el.className.toString().slice(0, 40) : "", x: Math.round(r.left), y: Math.round(r.top), w: Math.round(r.width), h: Math.round(r.height), txt: (el.textContent || "").trim().slice(0, 20) };
});
const hasRange = [...document.querySelectorAll("input[type=range]")].map(i => { const r = i.getBoundingClientRect(); return { x: r.left, y: r.top, w: r.width, h: r.height, min: i.min, max: i.max, value: i.value }; });
return { ok: true, rows, hasRange, cfgRect: (() => { const r = cfg.getBoundingClientRect(); return { x: r.left, y: r.top, w: r.width, h: r.height }; })() };
}result
{
"cfgRect": {
"h": 332,
"w": 226,
"x": 64,
"y": 6
},
"hasRange": [],
"ok": true,
"rows": [
{
"c": "",
"h": 40,
"t": "sketch-label",
"txt": "在图层中绘制",
"w": 226,
"x": 64,
"y": 6
},
{
"c": "",
"h": 22,
"t": "sketch-title",
"txt": "在图层中绘制",
"w": 90,
"x": 71,
"y": 15
},
{
"c": "",
"h": 22,
"t": "sketch-checkbox",
"txt": "",
"w": 45,
"x": 238,
"y": 15
},
{
"c": "",
"h": 22,
"t": "sketch-checkbox-track",
"txt": "",
"w": 45,
"x": 238,
"y": 15
},
{
"c": "sketch-one-column sketch-SubTool",
"h": 60,
"t": "sketch-grid-view-trigger",
"txt": "铅笔",
"w": 226,
"x": 64,
"y": 46
},
{
"c": "",
"h": 60,
"t": "grid-title",
"txt": "铅笔",
"w": 115,
"x": 129,
"y": 47
},
{
"c": "icon sketch-icon-pencil",
"h": 60,
"t": "span",
"txt": "",
"w": 60,
"x": 68,
"y": 47
},
{
"c": "sketch-one-column sketch-SmallGridViewTr",
"h": 40,
"t": "sketch-grid-view-trigger",
"txt": "正常",
"w": 226,
"x": 64,
"y": 106
},
{
"c": "",
"h": 40,
"t": "grid-title",
"txt": "正常",
"w": 115,
"x": 114,
"y": 107
},
{
"c": "sketch-paint-triggerLabel",
"h": 61,
"t": "sketch-label",
"txt": "填充\n\t\t\n\t\t\t\n\t\t\t\n\t\t\t\n\t\t",
"w": 226,
"x": 64,
"y": 146
},
{
"c": "",
"h": 22,
"t": "sketch-title",
"txt": "填充",
"w": 113,
"x": 64,
"y": 147
},
{
"c": " fill-trigger",
"h": 59,
"t": "sketch-paint-trigger",
"txt": "0%",
"w": 226,
"x": 64,
"y": 147
},
{
"c": "fill-indicator disabled",
"h": 59,
"t": "sketch-paint-block",
"txt": "",
"w": 90,
"x": 64,
"y": 147
},
{
"c": "",
"h": 59,
"t": "canvas",
"txt": "",
"w": 91,
"x": 64,
"y": 147
},
{
"c": "",
"h": 59,
"t": "sketch-opacity-droplet",
"txt": "0%",
"w": 136,
"x": 154,
"y": 147
},
{
"c": "",
"h": 59,
"t": "sketch-input",
"txt": "0%",
"w": 96,
"x": 154,
"y": 147
},
{
"c": "",
"h": 59,
"t": "sketch-input-content",
"txt": "0%",
"w": 56,
"x": 194,
"y": 147
},
{
"c": "sketch-paint-triggerLabel",
"h": 61,
"t": "sketch-label",
"txt": "描边\n\t\t\n\t\t\t\n\t\t\t\n\t\t\t\n\t\t",
"w": 226,
"x": 64,
"y": 207
},
{
"c": "",
"h": 22,
"t": "sketch-title",
"txt": "描边",
"w": 113,
"x": 64,
"y": 208
},
{
"c": "sketch-enabled stroke-trigger",
"h": 59,
"t": "sketch-paint-trigger",
"txt": "100%",
"w": 226,
"x": 64,
"y": 208
},
{
"c": "stroke-indicator",
"h": 59,
"t": "sketch-paint-block",
"txt": "",
"w": 90,
"x": 64,
"y": 208
},
{
"c": "",
"h": 59,
"t": "canvas",
"txt": "",
"w": 91,
"x": 64,
"y": 208
},
{
"c": "",
"h": 59,
"t": "sketch-opacity-droplet",
"txt": "100%",
"w": 136,
"x": 154,
"y": 208
},
{
"c": "",
"h": 59,
"t": "sketch-input",
"txt": "100%",
"w": 96,
"x": 154,
"y": 208
},
{
"c": "",
"h": 59,
"t": "sketch-input-content",
"txt": "100%",
"w": 56,
"x": 194,
"y": 208
},
{
"c": "sketch-RangeModule sketch-horizontal",
"h": 70,
"t": "sketch-label",
"txt": "线宽\n\t\t\t\n\t\t\t\t2px",
"w": 226,
"x": 64,
"y": 268
},
{
"c": "",
"h": 22,
"t": "sketch-title",
"txt": "线宽",
"w": 44,
"x": 64,
"y": 269
},
{
"c": "",
"h": 40,
"t": "sketch-input-container",
"txt": "2px",
"w": 55,
"x": 228,
"y": 267
},
{
"c": "value0 sketch-input",
"h": 30,
"t": "sketch-input",
"txt": "2px",
"w": 55,
"x": 228,
"y": 267
},
{
"c": "",
"h": 30,
"t": "sketch-input-content",
"txt": "2px",
"w": 55,
"x": 228,
"y": 267
},
{
"c": "animate",
"h": 30,
"t": "sketch-range",
"txt": "",
"w": 214,
"x": 70,
"y": 305
}
]
}拖动页面 · Sketchpad - Draw, Create, Share!


运行代码
async () => {
// 读取当前线宽数值,确认画笔已加粗
const cfg = document.querySelector("sketch-toolconfig");
const inp = cfg && cfg.querySelector("sketch-input.value0");
return { ok: true, width: inp ? inp.textContent.trim() : null, strokes: document.querySelectorAll("sketch-canvas").length };
}result
{
"ok": true,
"strokes": 0,
"width": "21px"
}拖动页面 · Sketchpad - Draw, Create, Share!


运行代码
async () => {
  // 确认线宽数值
  const inp = document.querySelector("sketch-toolconfig sketch-input.value0");
  return { width: inp ? inp.textContent.trim() : null };
}result
{
  "width": "4.54px"
}画笔已调至约 4.5px 粗、黑色,画布也已重建为空白。接下来先画自行车整体的骨架和两个车轮。
最近思考
The bike looks decent. But some issues:
1. The bottom bracket circle: my chain ring circle(770,880,30,24,2) rendered around (770,850)? The trace shows drag 770,850 → 785,854 which... hmm wait, the circle function drew first point at angle -90° → (770, 850) for r=30. Yes that's the chainring. Good.

2. The frame is missing the seat tube? Looking at image: I see down tube from (770,880) to head, the top tube from seat area to head, seat stays, chainstays. Looks like a bike. But there's a stray line crossing below - the "下管" from B to Hb(1018,695) and the down tube... In the image, there's a long line from around (600,290) to (1000,310)? Hmm.

Let me look closer at the image: The bike is drawn with the top tube going from left (seat) to head, and a diagonal line going down-right to the bottom bracket — that's the seat tube. Then chainstay to rear hub. Looks plausible. However the frame's top tube seems to pass at body height. And the handlebar looks like a "T" shape at top right which is fine.

Issue: The wheels look fine but the rear wheel spokes look like a fan (they're all drawn at same angles but appear uneven due to spokes with offset 0.2). Fine, hand-drawn.

Issue: there's a strange line from the bottom bracket extending down-left to (712,922) pedal - ok that's the crank.

The image shows the chainring around (770,850) — hmm, the crank arm from (770,880) to (828,838) but the image shows a line going down-left. Whatever, acceptable.

Problem: The frame's down tube from B(770,880) to Hb(1018,695) should be visible; in the image I see a line from around the bottom bracket going up-right to the head tube... Actually I see the seat tube going from (770,880) up-left to (632,655)? Hmm the image seems to show the diagonal from the bottom bracket up to the left (seat) — yes visible.

Wait, looking at the image again: the "top tube" from seat to head appears at y≈290 (screenshot scaled). It looks like the pelican area is empty, good.

Concern: the head tube/handlebar area: the stem goes from (1000,625) up to (1013,566), and the bar from (975,561) to (1074,552) plus grip. Looks like a T. Fine.

Now the pelican. Area available: above the seat, y from ~120 to 640, x from 400 to 1250.

But the bike top tube is at y=625-655 and the seat at 640. The pelican body will sit around y 440-660 and the head around y 280, beak to x 1200.

Hmm: the head at (955,322) is above the handlebar (y 552) — good, pelican leaning forward over the bars, beak extending right to x=1185. The beak would then be beyond the handlebar and front wheel (front wheel at x 860..1160, top y=730). Beak at y 300-430, above the wheel — fine.

Let me now draw the pelican. Also I might add: a small fish in the pouch? skip.

Let me refine the pelican coordinates with the current image in mind. In the rendered image (which is 1490x1202 scaled to ~496 width in my view), the seat is at approximately x 566-700 screenshot.

I'll draw:

Body closed curve (Catmull-Rom through):
(838,455), (760,438), (665,452), (592,505), (566,575), (596,642), (682,668), (772,648), (826,588), (842,505)

Hmm body bottom at 668 overlaps the seat line at 640-652 and top tube at ~625. That's fine — the body will cover part of the seat, appearing to sit on it. But the seat's right part (up to 700) will be hidden. Maybe move the body slightly up: bottom at 650.

Let me shift body up by 10: y values -10 → bottom 658. Hmm still covers seat. A pelican sitting on a saddle would overlap it. That's realistic. But visually the saddle disappears. Compromise: body bottom 645, seat at 640 → the seat is just below. Slight overlap ok.

Body points (adjusted):
(838,448), (758,432), (665,446), (592,498), (566,568), (594,634), (680,658), (770,640), (824,582), (842,498)

Neck: from body top-front area up to head. Head center (955,325) r=48 → bottom (955,373).
Neck edges:
left/inner: (790,470) → (800,415) → (830,378) → (885,360)
right/outer: (848,478) → (856,420) → (890,382) → (935,368)

Hmm the neck top should meet the head circle; head bottom is 373, so attach at y≈360-375 around x 900-940.

Beak: base at head right side. Head center 955, r 48 → right edge 1003, at y 325.
Upper mandible: (988,296) → (1045,300) → (1120,315) → (1185,340)
Tip: (1185,340) → (1178,356)
Pouch: (1178,356) → (1130,395) → (1065,420) → (1010,400) → (996,360)

Sunglasses: lenses:
big front lens center (982,312) r=26; back lens center (925,306) rx 20 ry 22 — but with the head circle r 48 centered (955,325): a lens at (925,306) distance ~24 from center, radius 22 → extends to 46 from center, inside head. ok.
Bridge: (957,303) → (962,306) small.
Temple arm: from (905,300) to (890,312) going back over head.

Hmm, in a 3/4 view facing right: place front lens center around (985,315) and rear lens center (930,308).

Hatch: diagonal lines inside each lens.

Wing: on the body. Draw a wing outline:
(650,500) → (700,478) → (760,500) → (800,545) → (790,590) → (735,600) → (690,570) → (655,540)
That's a closed loop? I'll draw as open polyline from (650,500) through those to (655,540), leaving a slight gap — looks like a folded wing.

Feather tips: 3 short strokes at the lower end: (790,590)→(755,615); (780,578)→(745,600); (768,566)→(736,586)? maybe skip to avoid clutter. Keep 2.

Wing reaching handlebar: from body top-front (800,470) to grip (1070,555): curve (830,470) → (900,495) → (975,520) → (1040,545) → (1065,552). This crosses over the bike's top tube. It will read as a wing/arm holding the bar.

Legs:
front leg: (770,645) → (800,740) → (815,825) → ankle (820,835)
back leg: (690,655) → (690,760) → (712,905) → ankle (718,918)
Feet (3 toes each):
front foot: (820,838) → (795,852); (820,838) → (828,858); (820,838) → (852,846)
back foot: (718,920) → (696,935); (718,920) → (724,940); (718,920) → (748,928)

Eyes: hidden behind glasses — skip.

Maybe add a crest/head tuft: 2 short strokes at top of head: (940,280)→(925,262); (960,278)→(950,258).

Also add a small detail: the beak's "upper mandible" line and the head outline.

To make the beak read as a pelican, the pouch needs to look like a big bag. Fine.

Let me also consider a fish tail sticking out of the pouch for character (skip, risk of clutter).

Now use Catmull-Rom smoothing for closed body curve and open curves. I'll write a helper that takes control points and samples with a given spacing, then draws overlapping chords of length ~2 samples.

Implementation:

```js
function cr(points, closed, samples=10) {
  const P = points.slice();
  if (closed) P.push(P[0]);
  // use points with wrap for closed
  const out = [];
  const n = P.length;
  const get = (i) => closed ? P[(i + n - (closed?1:0)) % (n - (closed?1:0))] : P[Math.max(0, Math.min(n-1, i))];
```
Simplify: implement Catmull-Rom for both cases with padded indices:

For closed: array C = points + points.slice(0,3) appended at start? Easier: duplicate: for closed, define ext = [points[n-1], ...points, points[0], points[1]] and iterate segments i=0..n-1 with p0=ext[i], p1=ext[i+1], p2=ext[i+2], p3=ext[i+3].

For open: ext = [points[0], ...points, points[n-1]] and segments i=0..n-2.

Then sample each segment with t in [0,1) at steps.

Then draw chords between consecutive sampled points, skipping every 2nd? To keep drag count low: sample spacing ~10px; each drag connects point i to i+2 (20px) → overlap 50%. Number of drags = samples/2.

Body circumference ~ 2π*140 ≈ 880 → 88 samples → 44 drags. OK.

Let me set spacing param: samples per segment fixed (e.g., 8-10), chord = 2 samples.

Careful: if control points are close, segments produce small chords; fine.

Let me now write the script. Also the pencil's taper means very short chords (like 20px) render fine.

After drawing, screenshot to review.

I'll add a fallback: if coordinateBasisReady false, throw.

Let me write code.

车架和车轮都已经画好。接下来要画戴墨镜的鹈鹕:身体、长脖子、大嘴袋、墨镜和翅膀。
最近思考
Overall it reads as a pelican on a bike, with sunglasses and a beak. Issues to fix:

1. The body looks like a rounded blob — acceptable, but the wing outline inside is a strange circle-ish shape. It looks okay-ish (wing loop).
2. The neck is too narrow/short — the head appears directly above the body front. Actually looking at the image, the neck looks like a thin S from body top to head: OK but a bit thin.
3. The beak/pouch: the pouch is drawn but the beak looks like an open "duck bill"? Looks decent — beak + pouch reads.
4. The sunglasses smudge at the head looks messy — the hatch lines and lens shapes overlap the head edge, and there's a dark scribble above the head (the crest lines look like antennae). The lenses look small and messy.
5. The pelican's head is a bit small relative to body.
6. Legs: the front leg goes into bike frame — the leg lines cross the frame; back leg goes down to pedal, looks okay.
7. The wings "arm" reaching to handlebar: the line from body to handlebar area — it seems to pass over the bike's top tube and head area. In the image I see a line from the body going right to the handlebar (there's a line ending near the handlebar). Actually the handlebar top right area got messed with the wing.

Biggest issues: face (sunglasses + crest) looks scribbly; the head area is cluttered. And the neck-torso junction: neck starts from body top, fine.

Improvements plan (without redrawing everything):
- The crest lines (two strokes above head) look like antennas sticking up — they read as messy. I could keep (pelican has a small crest) but they're too tall/thin. Maybe leave.
- Sunglasses: the lenses at (983,314) r26 and the back one drawn as a blob, plus hatch lines that extend outside lens → messy. Fixing means erasing parts, which is hard.

Options: I can't easily erase; undo would remove many strokes. But I could redraw the face area with better shapes — the old messy strokes would remain underneath, making it worse.

Alternative: draw white over the messy area? The canvas has a fill color white... The pencil fill is 0% and stroke black. I could set stroke to white and paint over the messy region, then draw the face cleanly. That's a legitimate "mouse only" approach (covering with white paint). But it would erase the head outline too and it's tricky to fill a region with strokes.

Hmm. Let's evaluate: is the current result acceptable? The task: "画一个戴墨镜的鹈鹕骑自行车" (draw with mouse only). The result is recognizable: penguin/pelican-like bird with sunglasses on a bike. The face region is scribbly but that's typical of a hand sketch.

I think improvements worth doing:
1. Enlarge/clarify the sunglasses: draw lens outlines slightly bigger and cleaner, plus thicker dark fill inside. But overlapping existing messy hatch might look worse.

Actually, looking closely at the face: I see two round-ish shapes and a dark patch, and above the head two lines. It's small (the head circle r=48 at this scale ≈ 3.2% of image height). At the display scale shown, the face is tiny.

Given the drawing is a sketch, the main weak points are:
- The "wing" loop inside the body looks like a random circle → could add feather lines to make it read as a wing.
- The neck looks too thin/detached? It seems fine.
- The bike handlebar got covered by the wing-arm → the handlebar looks odd at top-right of the frame.

Hmm, actually looking at the image at this scale, the "wing arm" reaching to the handlebar looks like a long thin curve going right, ending at the handlebar. Fine.

Additional improvements to make it clearly a pelican and cuter:
1. Add a small fish tail sticking out of the pouch (funny detail) — risky.
2. Add feather lines on the wing.
3. Add a tail at the back of the body (a few feather strokes) — the body back is at x=566; add 3 short strokes.
4. Clarify the sunglasses with a bridge and thicker temple.

Also: the legs look disconnected from the pedals? The front leg goes down into the frame area behind the chainring.

Honestly, I think adding a tail + feather lines + improving the glasses will help. But any new strokes on the face risk worsening it.

Let me zoom into the head area to see detail before deciding. I can screenshot a specific element region? The canvas is one element. I could use screenshot with target=css:canvas and maxWidth... it would return the whole canvas.

Alternative: use the browser zoom? Simpler: take a screenshot of the canvas region and view at high res: screenshot({target: "css:canvas", maxWidth: 2000}) — the returned image may be downscaled to 2048 max. The canvas is 1388x1314 bitmap; screenshot of it would be at 2x = fine, then the head area would appear bigger relative... no, same relative size.

I could zoom the app (Ctrl+= / browser zoom). Let's use browser zoom via Meta+"+"? That changes viewport and invalidates coordinates. Risky but I can restore zoom (Meta+0).

Alternative: read the canvas pixels to compute? Not needed.

Let me just do modest improvements at current scale, then take a final screenshot and evaluate. Improvements:
1. Tail feathers at body back-left.
2. 3-4 feather lines inside the wing loop.
3. Sunglasses: draw a cleaner bridge and re-emphasize lens rims with a slightly larger circle? Might add clutter. Instead: extend the temple arm across the head to the back — a clean line from lens back edge to (900,300) exists.
4. Maybe add a "fish" in the pouch: small line at (1100,412) as a tail. Cute. Hmm, might read as noise. Skip.
5. Add a few "motion" lines behind? skip.

Also maybe add an eye highlight? no.

Actually let me reconsider the biggest visual weakness: the head+glasses clutter. Let me zoom in to see. I can use CSS zoom on the page? Not allowed to modify page for observation...? Using browser zoom via keyboard is a normal user action; coordinates change though.

Alternative: take screenshot of the canvas element with destination to image collection? Not needed; simply the returned screenshot of the canvas element at natural size (1388x1314) will show the head area. The image rendering resolution in my analysis is limited but the returned image could be large. Let me try screenshot with target=css:canvas, maxWidth=2048. The canvas element is 694x657 CSS → screenshot ~1388x1314 (2x) → returned at up to 2048 wide, i.e., upscaled? no, it returns at device pixels 1388x1314. That's slightly more detail than the viewport screenshot (1488x1202). Similar.

Better: browser zoom to 200% temporarily using CDP? I can't run arbitrary CDP. But I can use Meta+"+" presses — Chrome zoom. After zooming, screenshot then press Meta+0 to reset. The page will re-layout, and canvas positions change — but I'm done drawing in that case. So: zoom in, inspect face, zoom back, fix.

Let's do that: press Meta+"+" twice, screenshot, then Meta+0.

Hmm, act_on_screen press with key "Meta+=" maybe. Let's try "Meta+Plus"? Use key "Meta+=" .

Actually simpler: I'll just decide from the current view. I'll make targeted improvements and accept the sketch aesthetic.

Let me look at the image once more mentally: The bird's body is a big oval sitting on the frame; the head is up-right with a long pointed beak and a bulging pouch; dark glasses. There's a scribble above the head (crest) that looks like hair — actually it kind of looks like a small tuft, fine.

The main oddity: the sunglasses lens rims overlap the head outline creating a "spectacle" look, plus the rear lens blob is a heptagon (from smooth closed with 6 points) — acceptable.

Decision: proceed with refinements:
1. Tail feathers: from (570,560) three strokes going left-down: (570,556)→(505,540); (572,572)→(500,568); (576,590)→(512,600).
Hmm the body back edge is at x≈566,y≈568. Tail should come off the back: strokes from (575,555) to (505,530), (578,575) to (500,580), (585,600) to (520,615)? Might collide with seat stay line (632,655)-(430,880) — no, that's lower.

2. Wing feathers: inside the wing loop: arcs from (700,520) to (760,560), (712,505) to (770,545)? Let's do 3 short curved strokes suggesting feathers:
 (668,512) → (700,545); (700,502) → (735,535); (735,500) → (768,532). These are inside the wing loop.
Actually the wing loop is roughly between (650,500) and (800,600). Feather lines going diagonally down-right at the lower part: (690,560)→(730,596); (720,545)→(770,585)? ok.

3. Improvement of the bird's "shoulder": a line from neck base to body? skip.

4. Legs: maybe add one more segment so they connect visually to the pedals.

5. Add a small fish tail sticking out of the pouch top? skip.

Let me also consider adding a helmet? No — sunglasses requested only.

One more consideration: the overall composition is a bit left-heavy: bike spans 280..1160, pelican 500..1190. Fine.

Let me look for one more issue: the pouch shape — in the image the beak looks like a long triangle with a curved bottom, reads well as pelican.

OK final touches: tail + wing feathers. Then final screenshot, and maybe export the image? The user asked to draw; providing the result is enough. Could also save an exported PNG via download. Maybe not necessary, but nice: export via the download tool (save icon at left, y=481). That might trigger a download of the sketchpad image. Optional — skip unless easy.

Let me do the touches.

细节收尾:给鹈鹕补上尾羽和翅膀羽毛,让轮廓更容易辨认。
历史思考 1
1/9
Now the drawing: pelican body with tail spikes at left (looks like spikes/whiskers, a bit odd but reads as tail feathers), wing hatch inside. Head has sunglasses and a beak with pouch. Issues remaining: 1. Tail feathers look like thin spikes sticking out to the left — a bit harsh but acceptable as tail feathers. 2. The wing hatch inside the body looks like a "basket" — it reads as wing feathers, fine. 3. The face: small head with dark scribble. Acceptable at this size, but the head/glasses messiness is the weakest part. 4. The bird's neck looks like a thin bottle-neck; body-to-head connection is a bit thin, but reads. 5. Legs: front leg is a straight line down through the frame to a foot near the chainring; back leg down to the rear pedal. Wait — looking at the image, I see one leg going down from body into the bike near the seat tube and ending with a small foot around the pedal. The other leg? It goes down at x≈706 to y=916 — in the image I see a line going down-left of the seat tube into the crank area. Hmm. Overall it's a decent sketch. Now, is it worth improving the face? The head is quite small; the glasses look like a smudge. Let me try to improve the face by making the sunglasses bigger and cleaner, drawn over the existing smudge with white fill then dark lens? Without fill white it will overlap. Actually maybe I should improve the proportions instead: the pelican's head looks tiny, and the beak is thin and pointy — real pelicans have a huge beak with pouch. In the image the beak+pouch looks like a long flat pouch attached to the head; ok. Given the aesthetic, I'd rather do one improvement pass on the head: - Draw a bigger lens outline circle (r=30) in front, plus the second lens, and darken with a tighter hatch. Overlapping the existing dark scribble will just look darker/denser — likely acceptable, actually making the glasses read as solid dark lenses. Risk: making it messier. Alternative: leave as is. Honest evaluation at the display size (496px wide view): the head region shows a dark blob with two round bits and something above — it looks like a bird wearing glasses. I think it's acceptable. Let me consider adding one more recognizable element: the pelican's eye is hidden, but adding a white/highlight isn't possible. Another improvement: the bird's body could be given a "chest" separation from the wing already there. I think a more valuable improvement: the front wheel/fork area — the wing-arm line ends near the handlebar and looks a bit like a stray line crossing the frame's top tube. In the image there's a long curve from the body top going right to the handlebar, crossing the top tube. That's the wing/arm holding the bar — reads okay. One thing that looks off: the handlebar looks like a "T" while the arm ends at the bar. Good. Also the pelican's tail spikes at x 486-572 look like they emerge from mid-body height — they're at y 528-606, body back edge — fine. Let me improve slightly: 1. Make the tail feathers look more like a fan: add one more stroke and shorten? They already look like feathers. 2. Add a saddle visible? Hidden by body. Fine. I think we're good. One last thing: maybe add a small "road" detail or a fish? No. Actually, let me reconsider the glasses — the ask was specifically "戴墨镜的鹈鹕" (pelican wearing sunglasses), so the sunglasses must be clearly visible. Currently they're a dark scribble. I should make them clearer: draw two distinct lenses with a bridge and temple, in a larger, cleaner form, and fill more solidly. Plan: draw over the existing face: - Front lens: circle center (990,318) r=30 (28 steps, span 2). This will enclose the existing scribble. - Rear lens: circle center (928,308) r=22 (ellipse-ish; use smooth closed with rx 20 ry 22). - Bridge: line (962,300)→(968,302)? Actually connect lens edges: front lens left edge at (960,318); rear lens right edge at (950,308). Bridge line (950,304)→(962,310). - Temple: from rear lens left edge (906,304) back to (888,300). - Fill front lens with 5 parallel diagonal strokes clipped inside r=26. - Fill rear lens similarly (3 strokes). The existing smudge already darkens it; adding clean rims will define the shape better. The risk: the old heptagon lens outline (radius ~22 at 925,308) sits inside; new rims at r=30 and r=22 would roughly align. Hmm, the old front lens was circle(983,314,26) and old rear heptagon around (925,306) r≈22. So new rims nearly coincide → just thicker outlines, plus cleaner hatching. That should improve legibility without adding stray marks. Also the crest above head: two lines from (938,280)→(922,262) and (958,277)→(950,256) look like antennae. I could leave them; they read as a small crest/tuft. Alternatively add a third so it looks like a tuft. Let's add one at (950,278)→(936,252)? Eh. Better: replace antennae impression by adding a small curved crest in front: line (966,280)→(978,262). Three tufts = crest. Fine, add one. Also maybe give the head a "cheek" line to separate the glasses from the beak? No. Let me do this face refinement and then final screenshot. Also I'd like to save the artwork: use the download/export? Could click 保存 (export) tool at left y=481 which opens export dialog — might be complicated but nice to deliver a PNG. Let's consider after the face fix. Actually delivering a saved image would be a nice artifact. The export tool likely shows a dialog with "下载" button. Risk of messing the drawing is low. I'll try after the face fix, and if it's complex, skip. Let's do the face pass.
历史思考 2
2/9
The head now has bigger dark lenses (visible dark glasses). At the small display scale it looks like the bird has sunglasses. Good. Remaining concern: the bird's neck and head area — the head appears merged with the neck top; the beak extends right with a pouch. I could still improve overall proportion: head bigger. But diminishing returns; the drawing reads. One more nice touch: a small tie/helmet? No. Let me do a final quality check by zooming in visually: take a screenshot of the canvas element to see detail at higher fidelity. The returned image might be ~1488 wide, similar. Actually element screenshot of canvas (694x657 CSS) at DPR 2 → 1388x1202; similar scale. I'd rather verify the overall look is good and finish. But hold on: is the pelican clearly "riding" the bike? The body sits above the frame and legs go to the pedals. Yes. One issue: the pelican's body is positioned so that its belly bottom (y≈658) is well above the top tube (y≈630 at x=632..1000)... Actually the seat is at y=640-652 which is under the body. Looks like sitting. In the image the body's bottom overlaps the top tube and seat region — reads as sitting on the saddle. I'm fairly satisfied. Let me also check that the drawing doesn't have leftover artifacts (the earlier dot at 600,1043 was undone). In the current image, near the bottom center, do I see a dot? I don't see one. Final step: save/export the artwork as PNG so the user has a file. Let's try the export tool (icon at left y=481, "exportDocument"). It will open a dialog with formats and a download button. Let me click it and screenshot. Risk: it may modify the page but not the drawing. Acceptable. Actually is it needed? The user just said "draw". Providing the drawing on the canvas is the deliverable. Saving a PNG is a nice bonus. Let's attempt briefly; if it's multi-step, I'll skip. Let me click the export tool at (50,481*2=962).
历史思考 3
3/9
Now I can see the drawing at larger scale. Observations: 1. The pelican's head: sunglasses are a dark scribble mass on the left side of the head — actually the head circle appears at (950,325) and the dark glasses cover most of it, looking like a big black blob at the front of the head. Hmm, it reads as dark glasses but heavy. The beak: upper line goes right and down... the beak looks like a long thin wedge with a pouch below — but in this view, the "pouch" is that oval below the beak at (1050,390). It reads as a beak with pouch. OK. 2. The neck: thin line from body going up to the head — appears as a narrow tube. But there's a visible gap: the neck left edge starts at (790,470) and goes up; looks okay. 3. The wing hatch inside the body: reads as a wing. 4. Tail: the 4 lines at left look like whiskers/quills — hmm, they look like "散射线" which is a bit odd. Could be read as tail feathers. Acceptable but slightly odd since they're thin and stick out from mid-body. 5. Legs: I see the front leg going down from the body to... it seems to merge with the seat tube line! In this bigger view, there's a leg from body bottom at (772,642) → (812,812) with a foot, and another from (690,652) → (716,916). Looking at the image, the front leg goes down into the frame, and near the bottom bracket there's a foot at around (730,930). Wait the visible foot lines are near (770,930)? The image shows: from body bottom, a line goes down-right to the chainring area, and a small "claw" at (740,930). Also the seat tube (770,880)-(632,655) crosses. Honestly the legs are a bit muddled but plausible. 6. Big issue: the neck-head area is disproportionately small vs the huge beak, and the "arm/wing" line crossing from body to handlebar creates a long diagonal that visually cuts the composition: I see a long line from the body top-right going to the right, ending near the handlebar at (1070,552) — it looks like it's crossing the frame's top tube and ends in mid-air near the handlebar. In this view, it looks like a stray line crossing the bird's chest region. Hmm. Looking at it: there's a line from around (830,470) up-right to (1070,552)? In the image I see a line starting near the neck base and going right-down to the handlebar — it reads as a wing extended to the bar. Acceptable but the wing shape looks like an outstretched stick. 7. The bike's top tube passes through the pelican's body (hidden). Fine. 8. The bike frame lacks the "seat stay" visibility? I see the diagonal from (632,655) to rear hub. Yes. Overall: it's a recognizable sketch: bird with sunglasses and long beak, on a bicycle. Given "用鼠标画" constraints, this is a decent cartoon. Improvements I could do quickly that would notably help: a) Make the sunglasses read better: currently a black blob merging with the beak base. Maybe add white "lens" separation — can't fill white easily... Actually I CAN: change stroke color to white, then paint over? That destroys outlines. b) The whisker-like tail: replace with a proper tail by adding a curve connecting the spikes? Adding a curve from (498,528) to (500,606) closing the tail fan would make it look like a tail. That's a good fix: draw an arc connecting the tips: from (486,550) curving to (500,606). Let me add: drag (498,528) → (488,545) → (492,572) → (500,606) — i.e., a curved line joining the feather tips, making a fan/tail shape. Wait, but the tail feathers emerge at the body edge; closing their tips makes a tail fan. Yes, add smooth curve through tips: (498,528), (486,550), (492,570), (500,606). That connects the spikes into a fan outline. Good improvement. c) The neck could be a bit wider: can't fix without erasing. d) The head: maybe move nothing. Let me also consider adding a small fish tail peeking from the pouch — cute and pelican-y. A small "v" at (1120,392)? The pouch bottom area. A fish tail sticking out at the top-front of the pouch: at (1080,378) draw a small triangle-ish: lines (1075,375)-(1090,360) and (1090,360)-(1100,378). Risk: looks like noise. Skip. Now, the export panel is open. Let's download PNG: "Download .PNG" is at y=445 (screenshot). Clicking downloads the image to the downloads dir. That gives the user a file. Let's do it after the tail fix (need to close the panel first). Order: click elsewhere / press Escape to close export panel, do the tail fix, then reopen export and download PNG. Let me press Escape. Careful: Escape closed panels before. Then run the tail-fix script. Actually, catch: the pencil config may reappear? No. Let me press Escape and then run the tail curve in the same step? Escape via act_on_screen press, then run_script for the tail. Two separate calls sequentially.
历史思考 4
4/9
Now add the tail fan closing curve. Also maybe add a second toe/connection of the wing to handlebar — skip. Insert: smooth curve from (498,528) → (484,552) → (490,578) → (500,606). This joins the feather tips. Also, the feather tips at (486,550) and (492,570) are inside; the curve will pass near them, creating a fan outline. Good. Additionally, I might add a "thigh" line to connect the body to the legs? Fine as is. Run it.
历史思考 5
5/9
The tail now looks like a fan/tuft at the back. Now export PNG for the user. Open export panel and click "Download .PNG". Then verify download via list_downloads, and mention it. Export panel coordinates (from earlier screenshot at same coordinate space): "Download .PNG" at (310, 445). Let me click export tool first (50,962), then click Download .PNG.
历史思考 6
6/9
Now click "Download .PNG" at (310,445). Note the export may open a dialog asking background/size. Let's click and screenshot. Also observe the drawing at this zoom: it reads as a bird leaning forward with sunglasses, big beak with pouch, sitting on a bike with legs to the pedal. Reasonable. Hmm, one thing: the pelican's legs look short and one is very close to the seat tube, so the "pedaling" isn't clear. Acceptable. Let me download PNG.
历史思考 7
7/9
Hovered over PNG. The click may not have actually downloaded; it highlighted. Perhaps a click opens a settings dialog, or it just needs a proper click. Let me check downloads list to see if a PNG was saved. Note the image is dimmed (a modal overlay?). Actually the whole canvas looks dimmed — maybe a dialog is loading. Let me check downloads.
历史思考 8
8/9
The PNG downloaded: Drawing-4.sketchpad.png (150KB) at 07:13:11. Now close the export panel (Escape) to leave the canvas clean. Let me press Escape and take a final screenshot to confirm the drawing remains. Then report to user. Also maybe save the PNG into the task's file artifacts via save_file? It's already in downloads; the download is registered. Good enough. Let me press Escape and take a final view.
最近思考
9/9
Final result. The drawing: pelican with sunglasses on a bike. There is one visible flaw: the "arm/wing" line from the body to the handlebar reads as a straight stick crossing the frame — it's the long diagonal from around (830,470) to (1070,552). At this zoom it looks like a long straight-ish line from the bird's chest to the handlebar, which is plausible as a wing.

Also the pelican's head is quite high above the body with a thin neck; the "legs" go down behind the frame.

I think it's good enough as a hand-drawn sketch. Let me report.

I could note the file path: ~/Downloads/Drawing-4.sketchpad.png.

Should I keep going to improve? The user's request was simple and playful. I'll deliver with a brief description of what was drawn and the file.

Let me confirm the download file path from list_downloads (only filename). Fine.

Report:
- 全程只用鼠标(CDP 鼠标拖拽)在 sketch.io 上作画
- 组成:两个带辐条的车轮、车架、车把、座垫、曲柄与脚踏、地面线;鹈鹕:身体、S 形长颈、大嘴+喉袋、墨镜(排线填黑)、翅膀搭在车把上、扇形尾羽、两条腿蹬在脚踏上
- 笔刷 4.5px 黑色,约 500 笔
- 导出了 PNG:Downloads/Drawing-4.sketchpad.png(150 KB)

Mention stroke count: 172 + 250 + 9 + 55 + 12 = 498 strokes.

I'll keep it concise.

执行脚本
Sketchpad - Draw, Create, Share!
1/9
运行代码
async () => {
  // 补充尾羽与翅膀羽毛细节
  let n = 0;
  const drag = async (ax, ay, bx, by) => {
    const r = await tools.act_on_screen({ action: "drag", x: +ax, y: +ay, endX: +bx, endY: +by, returnScreenshot: false });
    n++;
    if (r && r.coordinateBasisReady === false) throw new Error("basis lost");
  };
  try {
    // 尾羽(身体后侧)
    await drag(572, 552, 498, 528);
    await drag(566, 574, 492, 570);
    await drag(570, 594, 500, 606);
    await drag(556, 566, 486, 550);
    // 翅膀羽毛
    await drag(672, 512, 706, 548);
    await drag(704, 500, 740, 538);
    await drag(740, 502, 774, 540);
    await drag(700, 566, 740, 600);
    await drag(736, 552, 776, 586);
    await tools.screenshot({ format: "jpeg", quality: 85 });
    return { ok: true, strokes: n };
  } catch (e) {
    return { ok: false, error: e.message, strokes: n };
  }
}trace
tool.start
07:12:22
tool.end
07:12:22
tool.start
07:12:22
tool.end
07:12:23
tool.start
07:12:23
tool.end
07:12:23
tool.start
07:12:23
tool.end
07:12:23
tool.start
07:12:23
tool.end
07:12:23
tool.start
07:12:23
tool.end
07:12:23
tool.start
07:12:23
tool.end
07:12:23
tool.start
07:12:23
tool.end
07:12:23
tool.start
07:12:23
tool.end
07:12:23
tool.start
07:12:23
tool.end
07:12:23
result
{
  "ok": true,
  "strokes": 9
}
执行脚本
Sketchpad - Draw, Create, Share!
2/9
运行代码
async () => {
  // 强化头部墨镜:更清晰的镜框、镜桥、镜腿和更密的排线,补一根头冠羽毛
  let n = 0;
  const drag = async (ax, ay, bx, by) => {
    const r = await tools.act_on_screen({ action: "drag", x: +ax.toFixed(1), y: +ay.toFixed(1), endX: +bx.toFixed(1), endY: +by.toFixed(1), returnScreenshot: false });
    n++;
    if (r && r.coordinateBasisReady === false) throw new Error("basis lost");
  };
  const circle = async (cx, cy, r, steps, span) => {
    const pts = [];
    for (let i = 0; i <= steps + span; i++) {
      const a = -Math.PI / 2 + (2 * Math.PI * i) / steps;
      pts.push([cx + r * Math.cos(a), cy + r * Math.sin(a)]);
    }
    for (let i = 0; i < steps; i++) await drag(pts[i][0], pts[i][1], pts[i + span][0], pts[i + span][1]);
  };
  try {
    // 镜框
    await circle(988, 318, 30, 24, 1);
    await circle(930, 309, 23, 20, 1);
    // 镜桥与镜腿
    await drag(958, 312, 968, 306);
    await drag(907, 302, 888, 297);
    // 镜片排线(前片)
    for (let k = -2; k <= 2; k++) await drag(988 - 20 + k * 9, 318 - 22, 988 + 18 + k * 9, 318 + 20);
    // 镜片排线(后片)
    for (let k = -1; k <= 1; k++) await drag(930 - 15 + k * 9, 309 - 17, 930 + 12 + k * 9, 309 + 16);
    // 头冠
    await drag(966, 281, 980, 264);
    await tools.screenshot({ format: "jpeg", quality: 85 });
    return { ok: true, strokes: n };
  } catch (e) {
    return { ok: false, error: e.message, strokes: n };
  }
}trace
tool.start
07:12:38
tool.end
07:12:39
tool.start
07:12:39
tool.end
07:12:39
tool.start
07:12:39
tool.end
07:12:39
tool.start
07:12:39
tool.end
07:12:39
tool.start
07:12:39
tool.end
07:12:39
tool.start
07:12:39
tool.end
07:12:39
tool.start
07:12:39
tool.end
07:12:39
tool.start
07:12:39
tool.end
07:12:39
tool.start
07:12:39
tool.end
07:12:39
tool.start
07:12:39
tool.end
07:12:40
tool.start
07:12:40
trace
result
{
  "ok": true,
  "strokes": 55
}
点击页面
Sketchpad - Draw, Create, Share!
3/9
点击页面 · Sketchpad - Draw, Create, Share!


按下按键
Sketchpad - Draw, Create, Share!
4/9
按下按键 · Sketchpad - Draw, Create, Share!


执行脚本
Sketchpad - Draw, Create, Share!
5/9
运行代码
async () => {
  // 用一条弧线把尾羽末端连起来,形成扇形尾羽轮廓
  let n = 0;
  const drag = async (ax, ay, bx, by) => {
    const r = await tools.act_on_screen({ action: "drag", x: +ax.toFixed(1), y: +ay.toFixed(1), endX: +bx.toFixed(1), endY: +by.toFixed(1), returnScreenshot: false });
    n++;
    if (r && r.coordinateBasisReady === false) throw new Error("basis lost");
  };
  const cr = (pts, per = 8) => {
    const pad = [pts[0], ...pts, pts[pts.length - 1]];
    const out = [];
    for (let i = 0; i < pts.length - 1; i++) {
      const [p0, p1, p2, p3] = [pad[i], pad[i + 1], pad[i + 2], pad[i + 3]];
      for (let s = 0; s < per; s++) {
        const t = s / per, t2 = t * t, t3 = t2 * t;
        out.push([
          0.5 * (2 * p1[0] + (-p0[0] + p2[0]) * t + (2 * p0[0] - 5 * p1[0] + 4 * p2[0] - p3[0]) * t2 + (-p0[0] + 3 * p1[0] - 3 * p2[0] + p3[0]) * t3),
          0.5 * (2 * p1[1] + (-p0[1] + p2[1]) * t + (2 * p0[1] - 5 * p1[1] + 4 * p2[1] - p3[1]) * t2 + (-p0[1] + 3 * p1[1] - 3 * p2[1] + p3[1]) * t3)
        ]);
      }
    }
    out.push(pts[pts.length - 1]);
    return out;
  };
  try {
    const tail = cr([[500, 526], [482, 552], [488, 580], [502, 606]], 8);
    for (let i = 0; i + 2 < tail.length; i += 2) await drag(tail[i][0], tail[i][1], tail[i + 2][0], tail[i + 2][1]);
    await tools.screenshot({ format: "jpeg", quality: 85 });
    return { ok: true, strokes: n };
  } catch (e) {
    return { ok: false, error: e.message };
  }
}trace
tool.start
07:13:02
tool.end
07:13:02
tool.start
07:13:02
tool.end
07:13:02
tool.start
07:13:02
tool.end
07:13:02
tool.start
07:13:02
tool.end
07:13:03
tool.start
07:13:03
tool.end
07:13:03
tool.start
07:13:03
tool.end
07:13:03
tool.start
07:13:03
tool.end
07:13:03
tool.start
07:13:03
tool.end
07:13:03
tool.start
07:13:03
tool.end
07:13:03
tool.start
07:13:03
tool.end
07:13:03
tool.start
07:13:03
trace
result
{
  "ok": true,
  "strokes": 12
}
点击页面
Sketchpad - Draw, Create, Share!
6/9
点击页面 · Sketchpad - Draw, Create, Share!

点击页面
Sketchpad - Draw, Create, Share!
7/9
点击页面 · Sketchpad - Draw, Create, Share!

查看下载
8/9
文件
Drawing-4.sketchpad.png
查看Show HN榜单热帖.html
blob:chrome-extension://dknbdgkgoinlgjpfebapkklbmjjgdblm/529bd55f-9a9e-4988-99b3-a97e1fab422e
整理 HN 热帖并生成技能.html
blob:chrome-extension://dknbdgkgoinlgjpfebapkklbmjjgdblm/32d22ebd-d4d0-4834-8371-fc0b7e310076
arXiv 论文速览技能.html
blob:chrome-extension://dknbdgkgoinlgjpfebapkklbmjjgdblm/617b306e-6365-4f1c-b774-34de808bbee7
arxiv-paper-briefing (1).zip
blob:chrome-extension://dknbdgkgoinlgjpfebapkklbmjjgdblm/d84e24d6-b12d-4ad0-b068-6664cf9cc5f7
按下按键
Sketchpad - Draw, Create, Share!
9/9
按下按键 · Sketchpad - Draw, Create, Share!

画好了 🎨 全程只用鼠标拖拽(没有使用任何形状、文字或图片工具),在 sketch.io 的空白画布上一笔一笔画出来的。
画面内容
- 自行车:两个带 8 根辐条的车轮、花鼓、菱形车架(下叉、后上叉、立管、上管、下管、头管、前叉)、车把、座垫、牙盘、曲柄与脚踏,下面一条地面线。
- 鹈鹕:胖身体坐上车座、S 形长脖子向前伸、脑袋上架着一副黑墨镜(用斜向排线把镜片填黑,有镜框、镜桥和镜腿)、标志性的大长嘴 + 下垂的喉袋、胸前翅膀轮廓和羽线、扇形尾羽,两条腿分别踩在前后的脚踏上、脚蹼张开,翅膀还搭在车把上。
过程要点
- 先把铅笔笔刷从 2px 调到约 4.5px 粗、纯黑色,画布重置为空白;
- 曲线用「Catmull-Rom 采样 + 相邻弦段重叠」的方式还原,所以圆轮、鸟身和大嘴是平滑的曲线,而不是折线;直线部分(车架、辐条、地面)单笔拉直;
- 共约 500 笔鼠标拖拽,中途画错的地方用撤销清掉后重画。
成品文件:PNG 已导出到下载目录 —— Drawing-4.sketchpad.png(150 KB,1209×820)。
如果想再改,我可以继续加:比如给嘴袋里塞一条露出尾巴的小鱼、加个车铃或背景太阳/路面速度线,或者把鹈鹕体型再放大一版重画。