Create Mesh (Advanced)
In the previous sections, we learned how to create meshes with custom geometry by manually create vertex arrays. Inside G3D, when a geometry is created, some buffers will be created, which contains data of vertices, normals, element index and so on. Then G3D will interactive with WebGL system by these buffers. If the scene contains a large number of meshes, the amount of buffers will alse increase a lot, and during rendering, G3D need to switch these buffers frequently, and cost unecessary performances. Actually, we can cut them down with some advanced tricks.
This section will teach you how to use buffers to create custom shaped mesh.
Line Mesh
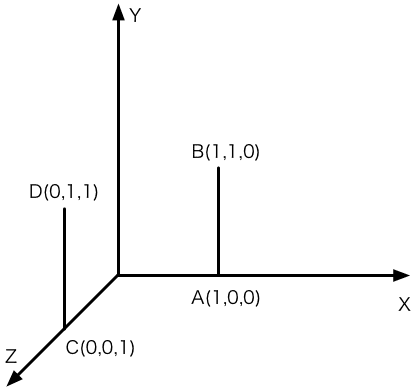
We begin from the simplest example. Suppose we need to create two line meshes AB and CD, each one is a line segment with lenght 1, as showing in the following image:
Let's check the code, which is a bit long:
The structure is similar with previous sections, but this example put the mesh-creating thing into four independent functions createMeshes(), createMeshesWithBuffers(), createMeshesSharedBuffers() and createMeshesSharedBuffersSO(). By default we call createMeshes() to create the meshes. You can comment this line and call any of the other 3 functions. The look will be the same, but implemention of the four functions are totally different. Study the four functions and you'll get a good understanding of data structure behind mesh and geometry.
// create engine, scene, camera and lights

createMeshes();
// createMeshesWithBuffers();
// createMeshesSharedBuffers();
// createMeshesSharedBuffersSO();
Let's see the first function createMeshes(), its way of creating meshes is the same with previous section. This is the simplest way: passing in vertex array and vertex index array.
const v1 = [
    1, 0, 0, // A
    1, 1, 0  // B
];
const i1 = [0, 1];
const m1 = new G3D.LineMesh(scene);
m1.geometry = new G3D.LineGeometry({
    vertices: v1,
    indices: { default: i1 }
});

// create m2 is similar
In the example, we made two vertex arrays v1 and v2 respectively, and we alse made two vertex index array i1 and i2. Then we create two meshes m1 and m2. When we were creating geometry, the LineGeometry constructor will transform the arrays into buffer. Actually, we are able to create buffer by ourselves, and then pass buffer to LineGeometry to create meshes. That is what createMeshesWithBuffers() did.
const v1 = [
    1, 0, 0, // A
    1, 1, 0  // B
];
const v1Buffer = new G3D.Buffer({ data: new Float32Array(v1) });
const v1BufferView = new G3D.BufferView({ buffer: v1Buffer });
const i1 = [0, 1];
const i1Buffer = new G3D.ElementBuffer({ data: new Uint32Array(i1) });
const i1BufferView = new G3D.ElementBufferView({
    buffer: i1Buffer,
    mode: 'LINES',
    count: 2
});
const m1 = new G3D.LineMesh(scene);
m1.geometry = new G3D.LineGeometry({
    vertices: v1BufferView,
    indices: { default: i1BufferView }
});

// create m2 is similar
Inside createMeshesWithBuffers() function, we deal with vertex array v1 and v2:
- Create
Float32Arraytyped array within vertex array; - Create a
G3D.Bufferobject within the typed array; - Create a
G3D.BufferViewobject with the buffer; - Pass the buffer view object as to
LineGeometryconstructor asvertices.
For vertices index array i1 and i2, we do the following:
- Create a
Uint32Arraytyped array within the vertices index array; - Create a
G3D.ElementBufferobject within the typed array; - Create a
G3D.ElementBufferViewobject within the element buffer, specifying the geometry modeLINESand vertices count 2; - Pass the element buffer view to
LineGeometryconstructor asindices.default.
Notice that buffer and element buffer is real data buffer, creating these will cause memory allocating and data filling, but buffer view and element buffer view are views, which is a ref to buffer or element buffer, with some information about which part of the buffer belongs to the buffer view.
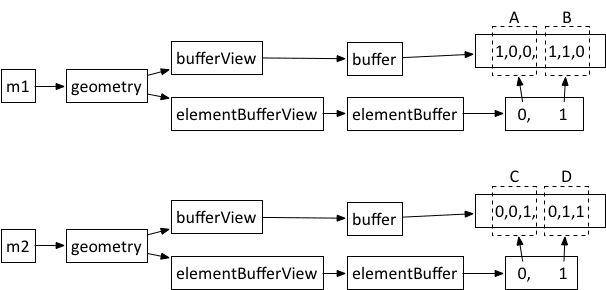
In this function, m1 and m2 has their own vertices buffer and vertice index buffer, so it's technically the same with createMeshes(). Now, let's put the two meshes buffer together and merge them into one buffer, using buffer views to allow they share the same buffer. See what createMeshesSharedBuffers() did:
const v = [
    1, 0, 0, // A
    1, 1, 0, // B
    0, 0, 1, // C
    0, 1, 1  // D
];
const vBuffer = new G3D.Buffer({ data: new Float32Array(v) });
const vBufferView = new G3D.BufferView({ buffer: vBuffer });
const i = [0, 1, 2, 3];
const iBuffer = new G3D.ElementBuffer({ data: new Uint32Array(i) });

const iBufferView1 = new G3D.ElementBufferView({
    buffer: iBuffer,
    mode: 'LINES',
    count: 2
});
const iBufferView2 = new G3D.ElementBufferView({
    buffer: iBuffer,
    mode: 'LINES',
    byteOffset: 4 * 2,
    count: 2
});

const m1 = new G3D.LineMesh(scene);
m1.geometry = new G3D.LineGeometry({
    vertices: vBufferView,
    indices: { default: iBufferView1 }
});

const m2 = new G3D.LineMesh(scene);
m2.geometry = new G3D.LineGeometry({
    vertices: vBufferView,
    indices: { default: iBufferView2 }
})
In this function, there's no independent v1 and v2, we merge them as v which container vertices positions of four points ABCD. We create vBuffer based on v, and them the vBufferView. When creating m1 and m2, we use vBufferView instead of v1 and v2.
And there's no independent i1 and i2 any more, instead we have the array i which value is [0,1,2,3]. We create a iBuffer, and then create two vertices index buffer iBufferView1 and iBufferView2. The different between them is byteOffset, one is 0 and one is 8. iBufferView1 represents the two vertices start from position 0, [0,1] ie, and iBufferView2 represents the two vertices start from position 2. Because the buffer is created with Uint32Array, each item of which is a 32-bit integer (4 bytes), so the byteOffset is 4 * 2, 8 ie.
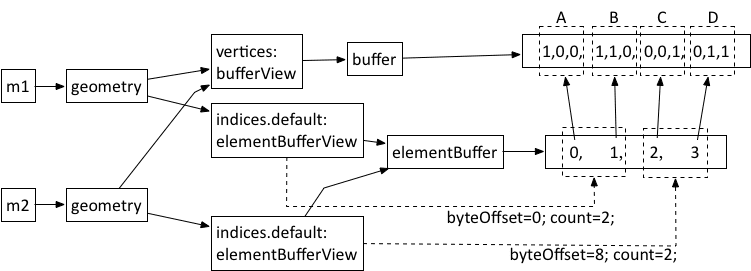
In this example, we create two different ElementBufferView, but they ref to the same ElementBuffer, so we created ElementBuffer for only once. It's a great improvment.
Sometimes, data in vertices buffer are not all useful data, and we can specify which part of Buffer belongs to a BufferView. Now, let's mix some useless data into array v (maybe these data will be useful sometime later), and when we create BufferView, we filter for useful data. Let's see what the last function createMeshesSharedBuffersSO() did:
const v = [
    99, 99,
    1, 0, 0, 99,  // A
    1, 1, 0, 99,  // B
    0, 0, 1, 99,  // C
    0, 1, 1, 99   // D
];
const vBuffer = new G3D.Buffer({ data: new Float32Array(v) });
const vBufferView = new G3D.BufferView({
    buffer: vBuffer,
    byteOffset: 4 * 2,
    byteStride: 4 * 4
});
const i = [0, 1, 2, 3];
const iBuffer = new G3D.ElementBuffer({ data: new Uint32Array(i) });
// below is the same with createMeshesSharedBuffers()
We add two useless value 99 at the head, and insert a useless 99 after each vertex. When we create vBufferView, we specify two arguments byteOffset and byteStride, which means the origin offset in bytes. We have two useless 99 at the head, so the offset is 8 (in Float32Array each value is 4 bytes long). byteStride is for the stride between two vertices. If it's not specified, it means the vertices is tight packed, no extra data between them, and if it's specified, we need to specify the total bytes for one vertex and one piece of extra data, here it's 16 bytes.
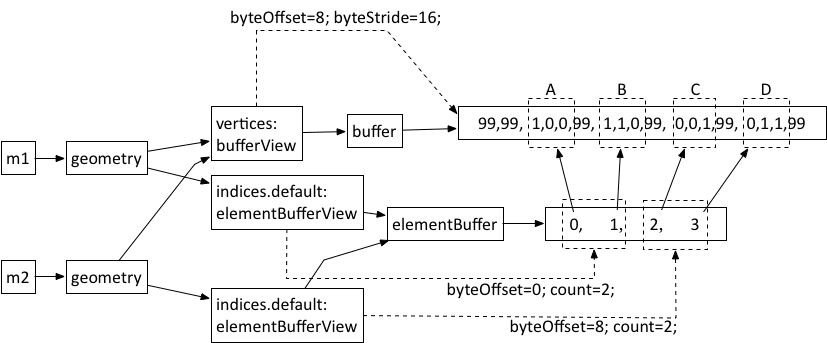
When creating line meshes, byteOffset and byteStride seems not that useful, but when we are creating face meshes, these two options will make sense.
Face Meshes
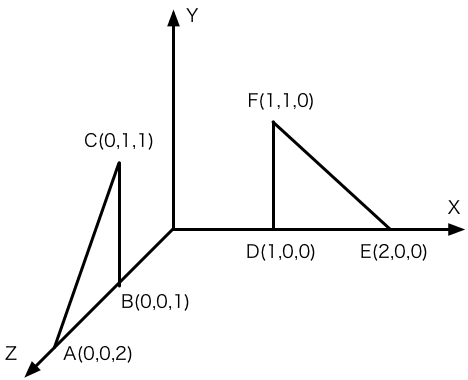
Next, let's look at how to create face meshes with shared buffers. Assume that we need to create two triangles ABC and DEF, as the following image shows:
See the example:
We created buffers, buffer views and meshes inside createMeshes() function.
const v = [
//  position   normal     uv
    0, 0, 2,   1, 0, 0,   0, 0,  // A
    0, 0, 1,   1, 0, 0,   0, 0,  // B
    0, 1, 1,   1, 0, 0,   0, 0,  // C
    1, 0, 0,   0, 0, 1,   0, 0,  // D
    2, 0, 0,   0, 0, 1,   0, 0,  // E
    1, 1, 0,   0, 0, 1,   0, 0   // F
];
const vBuffer = new G3D.Buffer({ data: new Float32Array(v) });

const verticesBufferView = new G3D.BufferView({
    buffer: vBuffer,
    byteStride: 4 * 8,
    byteOffset: 0
});
const normalsBufferView = new G3D.BufferView({
    buffer: vBuffer,
    byteStride: 4 * 8,
    byteOffset: 4 * 3
});
const uvsBufferView = new G3D.BufferView({
    buffer: vBuffer,
    byteStride: 4 * 8,
    byteOffset: 4 * 6
});
First, we pack vertices position, normals, uvs into one array v, 8 number for a vertex, the first 3 for position, the following 3 for normal, and the last 2 for UV. Then create a Buffer object vBuffer, passing in v. Then, create 3 BufferViews: verticesBufferView for vertices position,normalsBufferView for normal and uvsBufferView for UV. Their byteStride is all 32, cause each vertex occupy 8 numbers which is 4 bytes long. The three buffer views has different byteOffset, pointing to the area contains data the buffer view need.

The following code is similar with createMeshSharedBuffers(): create vertice index element i, and vertice index buffer iBuffer, and 2 buffer views iBufferView1 and iBufferView2. Notice that we specify mode as TRIANGLES instead of LINES, cause we are creating face meshes.
const i = [0, 1, 2, 3, 4, 5];
const iBuffer = new G3D.ElementBuffer({ data: new Uint32Array(i) });
const iBufferView1 = new G3D.ElementBufferView({
    buffer: iBuffer,
    mode: 'TRIANGLES',
    count: 3
});
const iBufferView2 = new G3D.ElementBufferView({
    buffer: iBuffer,
    mode: 'TRIANGLES',
    count: 3,
    byteOffset: 4 * 3
});
At last, create Mesh and Geometry, passing the buffer views created before, and everything is done!
const m1 = new G3D.Mesh(scene);
m1.geometry = new G3D.Geometry({
    vertices: verticesBufferView,
    normals: normalsBufferView,
    uvs: uvsBufferView,
    indices: { default: iBufferView1 }
});

const m2 = new G3D.Mesh(scene);
m2.geometry = new G3D.Geometry({
    vertices: verticesBufferView,
    normals: normalsBufferView,
    uvs: uvsBufferView,
    indices: { default: iBufferView2 }
});
The example created two face meshes whthin only one Buffer and one ElementBuffer. If we pass arrays directly like we did in the previous sections, it'll be 6 Buffers and 2 ElementBuffers.
Summary
In this section, we learned how to mannualy create buffers and buffer views, to control the progress of creating a mesh, thus to reduce cost and improve performance. In some simple scenes, you can pass arrays into geometry directly, as it is simple. But in some complex situations, G3D enable you to access the buffers and buffer views. So have fun!