Phong Material
Phong Material is a traditional lighting model material, its rendered color is affected by lighting and camera position. When the light is higher in intensity, or light is more perpendicular with the material face, the material would be lighted more. In G3D, these types of light play roles in lighting.
- Ambient light: ambient light lights the material evenly for each pixel. No matter how the face is facing, and where the camera is, each pixel of one material would be the same color.
- Directional light: direct light without attenuation. In any position in a scene, directional light's direction and intensity would be the same.
- Point light: emit light from one point. The direction of the light depends on the light's position and pixel's position. The intensity of light would be lower for farer positions.
Direction light and point light are direct lights, they have the 'direction', and direction would envolve in computing the final color. Ambient light is not direct, it has no 'direction' thing.
In G3D, phong material is G3D.PhongMaterial class. Meshes created by G3D.MeshBuilder.createCube() have a default material, which is PhongMaterial.
Check the example:
First, we create two light source: one ambient light and one direction light:
const light1 = new G3D.AmbientLight(scene);
light1.intensity = 0.3;

const light2 = new G3D.DirectionalLight(scene);
light2.direction = {x: 1, y: 2, z: 3};
light2.intensity = 0.7;
Then, we created a cube mesh, and specify a PhongMaterial object to it.
const cube = G3D.MeshBuilder.createCube(scene, 1);
const pMtl = new G3D.PhongMaterial();
cube.materials.default = pMtl;
Using dat.GUI to generate a control panel, we can adjust light and material options on the panel.
Light options
We can adjust the intensity sliders of both lights, set them to 0. This is equal to:
light1.intensity = 0;
light2.intensity = 0;
We can see the whole cube mesh turns totally black, because no light is lighting the material.
Notice that the background is not black, it's specified by
scene.clearColor。
Keep directional light's intensity as 0, and increase the intensity of ambient light, you'll find the cube mesh is lighted evenly, you would not be able to specify where each face is positioned. So this is what ambient color does.
Keep ambient light's intensity as 0 and increase directional light's intensity, you'll found each face is lighted in different degrees, as you can specify different faces. But there're still three faces totally black: the left face, the bottom face and back face.
Increase intensity of both lights, you can either specify each faces, and those three faces are lighted by ambient color at least. This is the simplest simulation of real world's lighting, but it can make some 3D feeling for users. Notice that when multiple lights are applied, their computed colors are linear combined to the final color.
Lights have not only intensity but also colors. You can adjust light's color and see how the rendered color is changed. For example, you can set directional color's G component as 120 and B as 40, and the cube will turn tan. This is equal to:
light2.color.g = 120;
light2.color.b = 40;
or (they are equivalent, cause the inital color of DirectionalLigth is {r:255, g:255, b:255}):
light2.color = {r: 255, g: 120, b: 40};Both lights' color and material's color (we'll discuss soon) effects the final color, for example, white light and red material result in red, as red light and white material result in red too. The red light and green material result in black, for green material will absorb red light totally.
Material options
Next, let's check the options in phong material. There's 3 channels for phong material: ambient channel, diffuse channel and specular channel, the finnal color would be the channels added together.
Ambient channel
Keep directional light's intensity as 0, and adjust R/G/B values of material's ambient channel, you'll see final color is changing. If you set ambient color as [100, 200, 200], the material turns turqoise, this is equal to:
pMtl.ambientColor = {r: 100, g: 200, b: 200};Diffuse channel
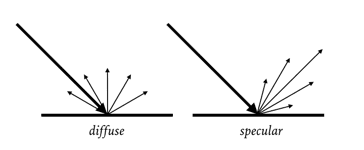
In diffuse channel, the rendered color depends on light's color, intensity, direction, and material's color, direction. The more material and light is close to perpendicular, the lighter the color will be.
In the demo, set ambient light's intensity to 0 and increase the intensity of directional light, set ambient color and specular color as [0, 0, 0], keep the diffuse color. You'll se three different lighted faces with is totally even inside the face. This equals to:
pMtl.ambientColor = {r: 0, g: 0, b: 0};
pMtl.diffuseColor = {r: 255, g: 255, b: 255};
pMtl.specularColor = {r: 0, g: 0, b: 0};
You can set not only color but also texture for diffuse channel. For example, we can load the following image and create a texture, and specify to the diffuse channel.

Check diffuse -> texture checkbox, you'll see the image is 'pasted' to the cube. The codes are:
const texture = new G3D.Texture({image});
pMtl.diffuseTexture = texture;
Specular channel
In specular channel, the finnal color depends on light's color, intensity, direction, and material's color and direction(above is same with diffuse channel), and camera's position. Even if the light's direction and material's direction is fixed, the rendered color will be different for different camera positions. If the camera is closer to the specular reflecting light's road, the material would look lighter, otherwise it'll be dark. Specular channel can simulate gloss of the material.
In the demo, set ambient light's intensity as 0 and increase the directional light's intensity, set ambient color and diffuse color as [0, 0, 0], keep the specular color. You'll see three different lighted faces which seems to have a gloss on the surface. This is equal to:
pMtl.ambientColor = {r: 0, g: 0, b: 0};
pMtl.diffuseColor = {r: 0, g: 0, b: 0};
pMtl.specularColor = {r: 255, g: 255, b: 255};
Actually, for ambient channel and diffuse channel, there's
ambientTextureandspecularTexture, but they're not commonly used asdiffuseTexture.
Summary
In this section, we learn about basic usage of phong material and lights in G3D.