First Steps
G3D is JavaScript 3D render engine based on WebGL. This series of guides will help you learn how to use G3D.
Installation and Usage
G3D library is published on NPM. You need to install G3D first.
npm install g3d --saveAnd involve G3D in your own building progress(using Webpack, eg).
import G3D from 'g3d';
console.log(G3D);
If you want to load G3D through a script tag (thought we don't recommed you to do so), you can find a UMD file at dist/g3d.min.js inside the package. You may need put the file on your server and load it using a script tag. Or you can easily use https://unpkg.com/g3d@latest/dist/g3d.min.js.
<script src="https://unpkg.com/g3d@latest/dist/g3d.min.js"></script>

<script>
    console.log(G3D);
</script>
Basics
To create and render a 3D scene, you need to follow the progress:
- Create an engine, specify the canvas instance(a
CanvasHTMLElementin web environment or a canvas-like object in hybrid environment). - Create a scene, specify the engine you just created.
- Create a camera. Mostly, you need to create a perspective camera, and here we create a rotate perspective camera.
- Create some lights. There're several types of lights here in G3D, we will create a directional light in this guide.
- Create some meshes. Here, we use MeshBuilder to create a plane mesh and a sphere mesh.
- Make the scene to render.
Scene and camera
Scene is a 3D space. In the space, object are positioned using three coordinate values (x, y, z). We created a rotate perspective camera, which can rotate in a sphere centered by the origin point (0, 0, 0). The camera is always aiming at the origin point. The alpha and beta value determined it's position in the sphere, and radius value determined how large the sphere is.
const camera = new G3D.RotatePerspectiveCamera(scene);
camera.alpha = 0;
camera.beta = 0;
camera.radius = 8;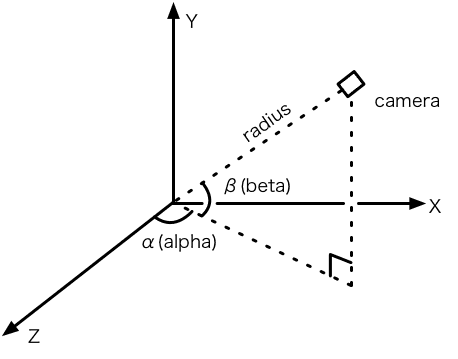
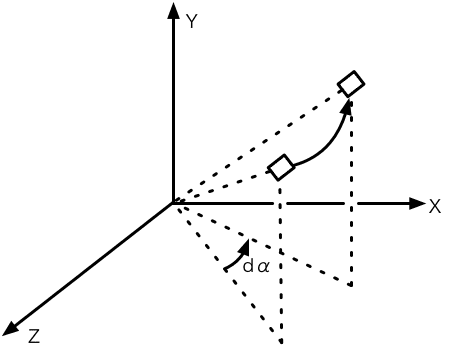
In the playground above, you can drag the mouse to rotate the camera, looking at the scene from different directions. (This function is done outside the main function.) Actually, I changed camera's alpha and beta properties. You may change them in render function to see what will happen. For example, you can add 1 to camera.alpha, and the camera will be rotating.
function render() {
    camera.alpha += 1;
    ...
}
Lights
Lighting is the basis of 3D rendering. Most objects' color relies on lighting, except those can emit lights themselves. In the previous example, we created a directional light, specified it's color, direction and intensity. The direction if (1, 0, 1), which means that the light's direction is parallal with the ray from (1, 0, 1) to the origin point (0, 0, 0). So, technically the light's literal 'direction' is (-1, 0, 01), exact the negative value of what we specified, and this is a convention of G3D.
const light1 = new G3D.DirectionalLight(scene);
light1.color = {r: 255, g: 200, b: 200};
light1.direction = {x: 1, y: 0, z: 1};
light1.intensity = 0.8;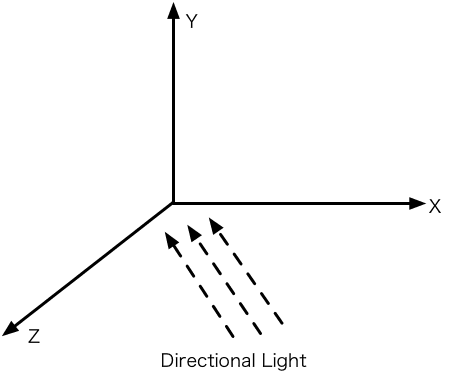
Light's color results in what the object will look like. Here the light is red, and mesh's face is white by default, so at last the mesh looks a bit red.
Create Meshes
Every object seeable in the scene is a mesh. Mesh is made of vertices and triangle faces. In the example abolve, we used some factory methods in G3D.MeshBuilder to create two face meshes with build-in geometries.
- First we called
MeshBuilder.createPlane(scene, width, height)and created a rectangle plan mesh, with width 6 and height 4. The center of the rectangle is origin point (0, 0, 0), so we setposition.zto -1, thus translated the rectangle along Z axis by -1. The center is (0, 0, -1) after translation. - Then we called
MeshBuilder.createSphere(scene, radius[, widthSegs, heightSegs])and created a sphere, with radius 1. The center of the sphere is also (0, 0, 0), we setposition.zto 1, thus translated it along Z axis by 1. The center is (0, 0, 1) after translation.
const m1 = G3D.MeshBuilder.createPlane(
scene, 6, 4
);
m1.position.z = -1;

const m2 = G3D.MeshBuilder.createSphere(
scene, 1
);
m2.position.z = 1;
Render
At last, let's start rendering! Literally, you only need to call scene.render() once, and the scene will be rendered to the canvas. But if anything, including the camera, the lights and meshes changed, the canvas will not update. You need to call scene.render() again to update the scene to the canvas.
Mostly we use a function named render, inside it we request to call render again at the next frame, thus we can begin a 'render loop', the loop body (ths render function) would be called on exactly every frame, so the canvas is always updated.
function render(){
    scene.render();
    requestAnimationFrame(render);
}
Everything is good, we call render() once, and there it goes!
Summary
In this section, we learned some basic knowledge about 3D programing and basic usage about G3D the engine, including scene, lighting, meshes and so on. I wish it would help you!